Loading...
Loading...
Loading...
Loading...
Loading...
Loading...
Loading...
Loading...
Loading...
Loading...
Loading...
Loading...
Loading...
Loading...
Loading...
Loading...
Loading...
Loading...
Loading...
Loading...
Loading...
Loading...
Loading...
Loading...
Loading...
Loading...
Loading...
Loading...
Loading...
Loading...
Loading...
Loading...
Loading...
Loading...
Loading...
Loading...
Loading...
Loading...
Loading...
Loading...
Loading...
Loading...
Loading...
Loading...
We’re excited to announce the launch of Clore VPN Beta! You can now connect to our VPN and enjoy enhanced privacy and secure internet access.
Follow these simple steps to get started:
Visit and purchase a VPN subscription.
After completing the payment, you will receive credentials for VPN access.
Use any VPN client that supports the VLESS protocol. Recommended clients for different platforms:
iOS:
Android:
macOS:
Insert the provided credentials into your VPN client settings.
You’re now ready to use Clore VPN!
We are actively building the server network for Clore VPN. If you own a server and want to contribute, follow these steps:
Go to your server settings on the Clore platform.
Click the Apply for VPN button.
We are particularly looking for servers located in the following countries:
Japan,
Netherlands,
Hungary,
Finland.
In the future, we plan to expand the list of available locations and add new countries as needed.
What is CLORE coin?
Clore Coin (CLORE) is central to the Clore.ai platform, built on principles of fairness, transparency, and decentralization. Unlike many cryptocurrencies, CLORE was launched without a premine or ICO, allowing anyone to participate in mining from the very beginning. This approach ensures that the network remains decentralized, with mining accessible to individuals using standard consumer GPUs.
ASIC Resistance and Decentralization
Clore Coin is specifically designed to be ASIC-resistant, preventing the dominance of specialized mining hardware and maintaining a decentralized network. By ensuring that mining is only possible with consumer GPUs, CLORE promotes a fair and democratic mining ecosystem, where power is not concentrated in the hands of a few large entities but distributed across a wide base of participants.
Limited Supply and Reward Structure
With a fixed maximum supply of 1.3 billion coins, CLORE’s scarcity is baked into its economic model. The block reward system started at 542 coins per block in December 2022 and decreases gradually over time, providing controlled inflation that ensures sustainable growth while maintaining the coin's value over the long term. As of July 2023, the block reward has already reduced to 473 coins, exemplifying this gradual reduction.
Windows: Hiddify for Windows
The distribution of mining rewards is a critical aspect of CLORE's tokenomics, designed to balance and sustain the ecosystem. Miners are allocated 50% of the block rewards, incentivizing them to maintain the network's security and efficiency. GPU hosters, who are crucial to the Clore.ai marketplace, receive 40% of the rewards. This allocation encourages more individuals and organizations to offer their GPU resources, bolstering the marketplace's capacity and competitiveness. The remaining 10% of the rewards are directed to the Clore team, funding ongoing development, infrastructure maintenance, and future innovation, ensuring the platform's continuous improvement and long-term viability.

Clore.ai is an innovative platform that revolutionizes the GPU leasing industry by creating a peer-to-peer marketplace for high-performance computing resources. The platform enables users to rent GPUs for tasks such as AI development, scientific research, and cryptocurrency mining, while allowing GPU owners to monetize their idle hardware.
Clore.ai differentiates itself by offering a peer-to-peer model that eliminates intermediaries, significantly reducing costs and increasing accessibility. This marketplace allows users to lease GPUs on flexible terms, making high-performance computing affordable and scalable. GPU owners can turn their idle resources into revenue, creating an efficient market for computing power that benefits both renters and providers.
A key feature of Clore.ai’s ecosystem is the Proof of Holding (PoH) system, which incentivizes users to hold Clore coins ($CLORE) in their official Clore wallet. The PoH system is designed to offer immediate rewards without requiring a minimum holding period, making it accessible and attractive to users. Participation in PoH is entirely voluntary, and users can withdraw at any time without penalties, ensuring full control over their assets.
1. On-Demand Leasing: This option comes with a 10% fee, which can be reduced to 5% through the Proof of Holding (PoH) system. On-demand leases are non-interruptible, meaning no one can overbid your offer, and the price is final. This is ideal for tasks that require uninterrupted computing power, such as AI development.
2. Spot Leasing: This option has a lower fee of 2.5%, which can be reduced to 1.8% thanks to the PoH system. Spot leases are interruptible, allowing other users to overbid your offer. This type of leasing is particularly suitable for tasks like cryptocurrency mining, where continuous processing is less critical.
There are two safe options, depending on where you currently hold CLORE:
If your CLORE is held on clore.ai, you can keep it there through the snapshot. After the snapshot, your balance will be shown as the new CLORE (ERC-20).
If you hold CLORE in your own wallet on the legacy PoW network, migrate using the official claim portal:
Claim portal:
Go to
Prove ownership of your CLORE on the legacy network by signing a message (the same flow as Proof-of-Holding / PoH)
In the “message” field, enter your Ethereum (EVM) address — the address where you want to receive the new CLORE (ERC-20)
Submit the signature → receive CLORE (ERC-20) 1:1
Do NOT enter an exchange deposit address as your EVM receiving address. Exchange deposit addresses may not credit properly and can lead to permanent loss.
Use an Ethereum address you fully control.
For signing (legacy-network proof): we recommend using Clore Wallet (or the legacy Qt wallet). For receiving (new network): use an Ethereum address you control (MetaMask / Trust Wallet / a hardware wallet). Using other wallets/exchanges outside the supported flow is at your own risk.
After the snapshot, the legacy PoW network is treated as deprecated and unsupported:
no exchange deposits/withdrawals
no marketplace deposits/withdrawals
no operational support
If you send CLORE over the legacy network after the snapshot, you should assume it will not be recoverable.
We will never ask for your seed phrase or private key.
We will never DM you “support links” for the migration.
Use the official domain only:
Always verify the ERC-20 contract address from official announcements before adding the token to your wallet.
Halt deposits/withdrawals on the legacy network (PoW CLORE): 20 Dec 2025 (UTC)
Snapshot: 21 Dec 2025, 00:00 UTC
Resume deposits/withdrawals (ERC-20 CLORE): 22 Dec 2025
Claim window is limited: after the snapshot you have 2 months to claim CLORE via If you do not claim within these 2 months, you will not be able to receive the tokens and the coins will be considered permanently unrecoverable.
Introduction to Clore.ai
Clore.ai is a revolutionary platform designed to disrupt the traditional GPU leasing industry. By offering a global, peer-to-peer marketplace, Clore.ai enables users to rent high-performance GPUs on demand, providing accessible and affordable computing power for a wide range of applications, including artificial intelligence development, scientific research, video rendering, and cryptocurrency mining.
The platform is built on principles of transparency and fairness. Clore.ai enables GPU owners to monetize their idle resources by leasing them out to users worldwide, while renters gain flexible access to the computing power they need without the high costs typically associated with traditional cloud providers. The platform operates using Clore Coin (CLORE), its native cryptocurrency, which facilitates transactions, rewards participants, and supports the platform’s sustainable growth.
Web Wallet: https://wallet.clore.ai/
If you’re trying to send Clore Coin from your wallet and encounter a “Transaction Failed” error, this might be due to having many small incoming transactions in your wallet. This issue is common with UTXO-based coins (like Clore Coin or Bitcoin), where multiple small inputs can limit your ability to send larger amounts in a single transaction.
Why This Happens:
If you’ve been mining directly into your wallet or have received many small transactions (e.g., 100 transactions of 10 coins each), the system may not be able to process larger amounts, like sending 1000 coins at once. In some cases, you might not even be able to send 300 coins in a single transaction.
How to Resolve:
• Send Smaller Portions: Try sending smaller amounts, such as 100 coins at a time. This helps the system manage the smaller inputs more efficiently.
• Consolidate Your Inputs: Another method is to send smaller amounts to yourself first, effectively consolidating your inputs. For example, send 100 coins at a time back to your own wallet. Once the inputs are consolidated, you can then attempt to send the desired amount in one transaction.
By following these steps, you can avoid the transaction failure error and manage your wallet more smoothly.
Clore.ai aims to make high-performance GPU resources accessible to everyone, from individual users and small startups to large enterprises. By providing a cost-effective and flexible marketplace, Clore.ai reduces the barriers to entry, allowing users to access powerful computational resources without the need for significant upfront investments in hardware.
Clore.ai is designed with long-term growth and scalability in mind. Through continuous innovation and community engagement, the platform fosters sustainable development. Its robust economic model, supported by the fixed supply of 1.0 billion Clore Coins (CLORE), promotes stability by gradually reducing rewards over time. This ensures the long-term value of the ecosystem and incentivizes users to actively participate through the Proof of Holding (PoH) system.
Clore.ai encourages active participation through the integration of its native cryptocurrency, Clore Coin. By holding and using CLORE coins, users can reduce fees and increase their earnings. The Proof of Holding (PoH) system rewards users for long-term engagement, creating a vibrant and loyal community that supports the platform’s ongoing growth and success.
Clore.ai is committed to continuous innovation and plans to introduce new services such as Clore VPN, and an AI and ML model marketplace. These additions will further enhance the platform’s value and utility for its global user base, positioning Clore.ai as a comprehensive solution for advanced computing needs.
Clore.ai not only provides a marketplace for leasing GPUs but also ensures that unused GPUs remain productive. If a GPU is not being rented out, owners can switch to cryptocurrency mining through HiveOS, ensuring that GPU resources are fully utilized and profitable.
The platform is designed to cater to a wide range of applications, including AI development, machine learning, scientific research, 3D rendering, and cryptocurrency mining. Clore.ai enables users from various industries to leverage its GPU marketplace for both short-term and long-term computational needs.


Clore.ai GPU Leasing Product
Clore.ai offers a platform that revolutionizes the GPU leasing industry by providing users with flexible, cost-effective access to high-performance computing power. Whether you are an AI researcher, cryptocurrency miner, or a creative professional, Clore.ai enables you to rent GPUs on-demand through a peer-to-peer network, ensuring you get the computational resources you need without the high costs associated with traditional cloud providers.
We are migrating CLORE from the legacy PoW chain to a new CLORE token on Ethereum mainnet (ERC-20). The migration is 1:1: every CLORE you hold on the PoW network at the time of the snapshot can be redeemed for exactly 1 CLORE (ERC-20).
Clore.ai offers two types of leasing options to cater to different user needs:
1. On-Demand Leasing: This option comes with a 10% fee, which can be reduced to 5% through the Proof of Holding (PoH) system. On-demand leases are non-interruptible, meaning no one can overbid your offer, and the price is final. This is ideal for tasks that require uninterrupted computing power, such as AI development.
2. Spot Leasing: This option has a lower fee of 2.5%, which can be reduced to 1.8% thanks to the PoH system. Spot leases are interruptible, allowing other users to overbid your offer. This type of leasing is particularly suitable for tasks like cryptocurrency mining, where continuous processing is less critical.
You can now list your servers in USD while the system automatically adjusts the CLORE price in real time during the rental, based on the current exchange rate. No more worries about coin fluctuations — your pricing stays accurate and fair in USD terms throughout the rental.\
Example
Target price: $10/day
If 1 CLORE = $0.05, the rental price is 200 CLORE
If 1 CLORE = $0.10 during the rental, the price adjusts to 100 CLORE — automatically, in real time
Notes
Currently works only for On-Demand orders.
For Spot orders, the legacy Calculate Based on USD option still applies: the CLORE amount is calculated at the moment the rental starts and remains fixed for the duration.
If you encounter any issues, please report them in the support chat.
Clore.ai connects GPU owners and renters through a marketplace, allowing GPU owners to monetize their unused resources while providing renters with affordable access to high-performance GPUs.
The platform supports a wide range of applications, including artificial intelligence (AI) development, machine learning, scientific research, video rendering, and more.
GPU owners can list their idle GPUs on the Clore marketplace, turning unused resources into a revenue stream. By participating in the marketplace, owners can optimize the use of their hardware and generate income.
When a GPU is not rented out, Clore.ai allows owners to utilize HiveOS’s flightsheet to mine any cryptocurrency of their choice. This ensures that GPU resources are always productive, generating income even when not in use by a renter.
Clore Coin (CLORE) is an L1 Proof of Work (PoW) coin, and 40% of the block reward goes directly to the hosts. This unique structure means that Clore.ai effectively pays hosts more than the rental fee itself. For example, if a user rents a GPU for $10, competitors typically take around 20% as a fee, resulting in the host receiving just $8. In Clore.ai’s case, the user pays $10, Clore.ai takes a 1.8-10% fee, and thanks to the block reward system, the host could receive an additional amount from the block reward, which currently could be around 50% of the rental. This means the host ends up receiving $15, while the renter only pays $10.
Clore.ai offers highly competitive pricing compared to traditional cloud providers. The platform’s operational efficiencies allow for lower costs, which are passed on to users in the form of reduced fees.
The platform also supports spot and on-demand orders, allowing users to choose the pricing model that best suits their needs.
1) Browse and Select GPUs: users can browse the available servers with desirable GPUs on the marketplace and select the ones that meet their computational requirements. Filters such as GPU type, number of CPU cores, Ethernet speed, price, and many more are available to help narrow down the options.
2) Set Job: create a task for this server: it could be mining a specific cryptocurrency or training an AI model.
3) Monitor and Manage: clore.ai provides tools for monitoring and managing rented GPUs. Users can track performance, adjust settings, and manage their rentals through an intuitive dashboard.
4) Idle GPU Mining with HiveOS: for GPU owners, Clore.ai offers the ability to mine any cryptocurrency through HiveOS’s flightsheet if the GPU is not currently rented out. This feature ensures that the GPU remains productive, generating income even when not in use by a renter.
• AI Developers and Researchers: Access powerful GPUs for training machine learning models, running simulations, and conducting research.
• Cryptocurrency Miners: Leverage Clore.ai’s network to mine cryptocurrencies efficiently with high-performance GPUs.
• Creative Professionals: Utilize GPUs for rendering 3D graphics, editing videos, and other intensive creative tasks.
• Businesses and Startups: Scale computing resources on-demand to meet project needs without investing in expensive hardware.

The biggest structural issue with PoW for CLORE is constant sell pressure from miners. Mining rewards are regularly sold to cover electricity and operating costs, which creates a built-in, ongoing headwind that is difficult to outgrow.
We spent over 1.5 years working toward PoS. We tested, iterated, and invested significant effort because we believed PoS could be the “next stage” of the Clore chain. This decision was not easy — we truly tried. But as the work progressed, it became clear that finishing PoS properly would require at least another full year of focused, full-team development, which would significantly distract us from other critical work across the project.
And even if we committed that time, PoS would still not solve our core objective. PoS does not remove sell pressure — it shifts it. Our main motivation for leaving PoW is reducing structural sell pressure. With PoS, sell pressure still exists: it comes from stakers harvesting yield rather than miners selling emissions.
After deep internal evaluation, we decided to pause the PoS transition and proceed with an ERC-20 migration for these reasons:
Maintaining a custom wallet stack adds significant complexity.
Exchange integrations are slower and more difficult.
Infrastructure overhead is higher.
Composability with the broader crypto ecosystem is lower.
The ERC-20 path gives us a cleaner foundation to build a healthier long-term model around real product usage.
Immediate wallet support: MetaMask, Trust Wallet, Ledger, Trezor, and many more (standard ERC-20).
DEX liquidity from day one: Uniswap and other DEXs are available immediately.
Team allocation reduced: 10% → 4%, with a 5-year vesting schedule.
Faster integrations + new listings: exchanges and custodians already support ERC-20 flows, enabling quicker rollouts and more exchange listings over time.
Faster deposits: deposit confirmations on the Clore marketplace and exchanges will now take under 3 minutes.
Reduced emission / no miners: miner sell pressure is removed, creating a cleaner long-term supply dynamic.
Reduced supply: supply is reduced via the announced burn mechanics (see official timeline/details).
Better ecosystem tooling: explorers, analytics, custody solutions, treasury operations, and DeFi infrastructure.
Bigger reach + stronger tech foundation: easier onboarding for a wider audience and more flexibility for future product + DeFi integrations.
Cross-chain expansion (planned): bridges to BSC / Polygon / Solana and other networks (details will be announced; use official bridges only).
More openness & decentralization: ERC-20 standards make CLORE easier to integrate, verify, and use across the broader crypto ecosystem.
Announcement 16 Dec 2025 — we publicly announce the snapshot window and the migration process.
Legacy deposits/withdrawals close 20 Dec 2025 (UTC)
Snapshot 21 Dec 2025 — 00:00 UTC
Claim starts immediately after the snapshot. After you submit your claim, your new tokens will be delivered within 48 hours.
At this moment:
The PoW chain becomes unsupported for deposits/withdrawals across exchanges and clore.ai.
Exchanges switch to supporting deposits/withdrawals only via the new ERC-20 network.
clore.ai switches to supporting deposits/withdrawals only via the new ERC-20 network.
Trading remains active (no trading halt is required for the snapshot). Only legacy-network deposits/withdrawals are affected.
Claim window: users will have 2 months to claim/swap their CLORE to the new network.
L1 holder claim pool (Main multisig): 630,000,000 CLORE This corresponds to the approximate amount currently held by users on the PoW chain and is reserved for 1:1 conversion of existing PoW holders (claim portal + exchanges).
Marketplace Rewards Vesting: 143,000,000 CLORE Rewards pool for PoH + marketplace incentives.
Team Vesting: 40,000,000 CLORE Vesting: 5 years Cliff: 6 months
Marketing Vesting: 87,000,000 CLORE Vesting: 2 years
Treasury Safe: 25,000,000 CLORE
POL (Protocol-Owned Liquidity) Wallet: 25,000,000 CLORE
Ecosystem Wallet: 25,000,000 CLORE
Growth Wallet: 25,000,000 CLORE
CLORE (ERC-20) on Ethereum mainnet: 0xe60201989b8628f43dc0605f585a72bcf1f1e977
Team Vesting (5 years, 6-month cliff): 0xAA2d16f6134B7f0D861785B2785C90f6E9914f24
Marketing (2 years vesting): 0xd903325a3f9def246629ab1c92ba42fa7c90d14f
Marketplace Rewards (2 years vesting): 0xc4c910324a2e95a975d22394c0277b290c68cbb0
Main multisig (L1 holder claim pool): 0x7E12737906b92944227f5867B6141290Ea9C775a
Treasury Safe: 0x80eB6B2d648dF461F828af6d66Acee0dCDfcf9E6
Liquidity / POL multisig: 0x5151eb844f9f79611be28dda4220debe44617314
Ecosystem multisig: 0xFe79D578C02A98bd8AE272d6826eEA2092049538
Growth multisig: 0xafdD92B6130c4B13366EFc878fA6B7E4E1D415C5
Team wallet: 0x6195C21Effa5f0a3C7f542616858c2C01C34077b
Marketing wallet: 0xb2362cf645a494145881855a21b82b5b3f27a7dc
Marketplace wallet / rewards operator: 0x7A235C00841639868322eE478b605dD70BD37b97
Rewards for PoH and marketplace activity are funded from a dedicated rewards pool.
Initial daily emission: 164,000 CLORE/day (82,000 PoH + 82,000 marketplace)
Decay schedule: −30% per year implemented via a monthly factor r = 0.7^(1/12)
CLORE is the core payment and incentive asset in the Clore ecosystem:
Payments on the GPU marketplace CLORE is used as the payment token for renting GPUs and related services on clore.ai.
Payments for Clore VPN (where available) CLORE is used as the payment token for accessing Clore VPN.
PoH & marketplace rewards / fee tiers CLORE is used in our Proof-of-Holding and marketplace reward system (fee reductions and rewards for active participants).
Sometimes, an error may occur when attempting to reinstall drivers. To resolve it, follow these steps:
Put the rig in maintenance mode in HiveOS by disabling driver loading.
Disable services:
systemctl disable clore-hosting.service
systemctl disable docker.service
systemctl disable docker.socketReboot the system:
rebootInstall the required drivers:
To install a specific driver version, use the command:
Or to install a driver from a link on the NVIDIA website:
Update the system (optional):
Disable maintenance mode and re-enable all services:
A significant portion of the machines on CLORE.AI are located in Russia, primarily due to the availability of affordable energy.
Different services, even connections to general purpose virtual/dedicated servers in other countries might get blocked from some Russian ISPs, CLORE.AI is distributed permissionless network having many hosts, that are using residential/business internel connections in Russia, which depending on the Internet Provider might be restricting access to non standard protocols like
stratum+tcp / stratum+ssl
GigaSPOT - Market leading compute power trading system
A trading system for GPU server owners and clients demanding computing power for interruptible tasks. Goal of the system is a self regulated permissionless market in which interests of all parties are covered and incentivized to create maximum positive outcome for all participants.
GigaSPOT allows anyone to place bids on machines with whatever workload
Power is guaranteed by client requesting power limit for GPU(s) in the machine. Let's imagine a workload that is bottlenecked by VRAM bandwith and 450W GPU will end up drawing only 280W. Lowering Power Limit to 280W has no impact on workload speed. Because of this we decided to assume power limit as workload power draw
Issue: Server is online in HiveOS but appears offline on Clore.ai. Symptom: Server shows as online in HiveOS, but remains offline on the Clore platform.
Run the command:
If the response isActive: inactive (dead) — the service is not running and is not enabled on startup.
1. Navigate to the .
2. Select the preferred server from which you would like to start your rental.
3. Click the “Rent” button next to the chosen server.
4. Configure your server image. For this example, select Ubuntu Jupiter.
5. Once the configuration is complete, click “Save Template.”
6. Assign a name to your template and click “Create.”
7. Return to the , and you will now see a template icon.
The Telegram Bot Notifies You of the Start and End of Rentals, and Also Provides Information About Your Servers — a Useful Tool for Convenient Management.
To connect the bot, follow these steps:
1. Go to your CLORE account, open the Settings section, and click Link account.
The bot will automatically open in Telegram. Send it the /start command.
3. Copy the provided link and paste it into the browser where you are logged in on the CLORE website.
Done, the bot is connected! Now you will receive notifications about the status of your servers directly in Telegram.
Website:
Marketplace:
POH Marketplace:
Roadmap:
Proof of Holding:
BitcoinTalk:
Twitter:
Telegram:
Discord:
websockets
or even any TCP/UDP connection from some hosting providers
Mainly because of automated firewall, that tries to prevent connections to VPN services and non standard protocols/general purpose server might be flaged as such
In some cases even the domain might play a role for https traffic shown for example in post probably because of SNI header mentioning non-ru domain on the request (in TLS under version v1.3)
The reality is very specific depending on many factors, that are not fully publically known, this article can provide you with help mitigating false positives in blocking your connections
In GigaSPOT snapshots, the country code is specified in ISO 3166-1 alpha-2
When using public mining pools, try to use stratum hosted in Russia for connections on machines located in Russia, which can be determined by country code shown for each machine in GigaSPOT market in ISO 3166-1 alpha-2 format. Important to say, some machines in russia lately have been having Kazachstan "KZ" IP address, so they are reported as KZ, it's generarly safe to assume all KZ as RU and use same configuration for both
For example you might have your own host for serving scripts and files for deployments on GigaSPOT, protecularly useful for running workloads from Ubuntu Base Image
In such cases i might recommend to put your host under cloudflare proxy, which is generarly accesible. We have seen cases, where websocket API for example under cloudflare got restricted access from some Russian Internet Providers, it's not likely to happen, but obtaining .ru domain helped
Also you can try setting up the host in Russia, great option might be https://pq.hosting/ which accepts cryptocurrency payments.
You can setup checks and have separate endpoints for machines in Russia and outside world and start your workload acordingly depending which endpoint it can reach, here it's impossible to give a guide, as implementation might be very different for different workloads.
You can make your bot deploy 2 variants of your workload, that can be adjusted maybe by ENV, different image, entrypoint... To differentiate Russia and outside world. As mentioned previously some Russian machines show up as Kazachstan "KZ", it's safe to assume Kazachstan as Russia for this purpose.
While at the moment majority of machines in Russia don't have such issues with restricted connections, it isn't rare to happen and it's better to be prepared to prevent financial losses.
Ideally use some of the mentioned tricks or you can try to sustain blacklist of machines, hosts that fail to work properly, which can be cause by these restrictions


We disclose our team wallets for transparency. These funds represent the core development reserve and operational liquidity; they are used to support protocol growth, operations, and market liquidity (not for routine selling).
Buyback Wallet: AXcP7Rt5rvPeBkpz3QYZKzst7Hj2Rjzonb
Purpose: Dedicated to buyback operations.
Main Wallet: AePr762UcuQrGoa3TRQpGMX6byRjuXw97A
Purpose: Core development reserve for long-term sustainability.
Payout Wallet: AL5y3MCskaJp7UNxnzFeiAjkmWwnRPgZHT
Purpose: Operational payouts. Note: because Clore is UTXO-based, this address can look empty at first glance; the transaction tree reflects active usage.
Cold Wallet 1: AevWT9m5tErtgQXXao23z1pmZ7NK86ikvb
Purpose: Long-term cold storage.
Cold Wallet 2: ARg56xF4eMJTaksdH3Xf2SLhpE7E5jCMzd
Purpose: Long-term cold storage.
Market Maker Wallet (Locked): AHLZiei9D6s5zaZR2CUusRQb3bcowUeYks
Purpose: Used strictly for market-making liquidity operations.
Burn Address (Official): AP6RNAdjGgkX2QERU3Gr5VV5hvidu6xgau
Purpose: Permanent, irreversible coin burn. One-way only — funds sent here cannot be recovered.
Exchange Wallets: Platforms: HTX, MEXC, Gate, BingX, BitMart, XT, LBank. Purpose: Liquidity provisioning on exchanges (not active trading or treasury management).
nvidia-driver-update 525.116.04 --force
Enable autostart and launch the service:
Check again:
If the service status isactive (running) — the server should appear online on the Clore platform.
To avoid issues after reboot, make suer to add all necessary components to autostart:
Check functionality after reboot:
After reboot, the server should start automatically and appear online.
systemctl status clore-hosting.servicesystemctl enable clore-hosting.service
systemctl start clore-hosting.servicesystemctl status clore-hosting.servicenvidia-driver-update https://us.download.nvidia.com/XFree86/Linux-x86_64/550.67/NVIDIA-Linux-x86_64-550.67.runapt update
apt upgrade
apt autoremovesystemctl enable clore-hosting.service
systemctl enable docker.service
systemctl enable docker.socket
rebootsystemctl enable clore-hosting.service
systemctl enable docker.service
systemctl enable docker.socketrebootWorkloads get reevaluated on each billing interval to determine the most profitable one
Docker image from CCR or predefined image configured by ENV
Price in $CLORE/day
Overclocking settings (individual per each GPU in machine)
Power Limit (W) *mandatory
Core Lock (MHz)
Mem Lock (MHz)
Core Offset (MHz)
Mem Offset (MHz)
Environmental Variables *optional
While it's not mandatory to setup Core Lock Mem Lock Core Offset Mem Offset it's very much recommend to achieve expected performance, because otherwise it's values can't be guaranteed
Power Limit can be specified in range of card minimum to PL set by hosting provider in background job OC
Locks and Offsets could be configured in allowed ranges chosen by CLORE.AI team, these ranges are specified in the snapshot of the marketplace

9. Click on every desired server. The rental process will automatically begin.


This section shows how to add a server (rig) to Clore.ai using HiveOS: system preparation, installing Clore Hosting, applying the token, starting a flightsheet
Open HiveOS → Workers → your rig → Create Flight Sheet.
In the Coin field, type clore rentals and select it from the list.
Click Get token.
After clicking Get token, you’ll be redirected to Clore.ai.
Click Login with HiveOS and approve the sign-in.
Set the price and maximum rental duration.
Click Apply the token to HiveOS — the token will be auto-filled into the Wallet field of your HiveOS flightsheet.
Go back to HiveOS and continue completing the flightsheet.
In HiveOS, click Create Flight Sheet.
Verify the Wallet contains your token and Coin: clore rentals is selected.
Click Create.
Open HiveOS → Farms and go to the workers list.
Select the required farms/workers (use Select all if needed).
Click the Rocket / Apply action.
From the dropdown, choose the created Flight Sheet and click Apply to selected.
Done. Good job — now go to and handle everything else in Marketplace → My Servers.
You’ve got two options:
If your server already shows up in “My Servers” on our site and is online — just disable the clore.rental flight sheet in HiveOS and apply your own mining flight sheet for idle mining.
Add a second miner to our clore.rental flight sheet — edit the sheet in HiveOS, click Add miner, configure your coin/pool/miner, and save. It will run when the rig isn’t rented.
The Proof of Holding (POH) Marketplace is an innovative platform within Clore.ai that allows users to maximize the utility of their CLORE coins. The marketplace serves a dual purpose: it enables coin holders to earn passive income by renting out their CLORE coins, and it allows others to rent these coins to increase their earnings from the network’s rewards system. By participating in the POH Marketplace, users can either profit from holding CLORE coins or enhance their staking power to receive a larger share of network rewards.
POH Marketplace is designed as a convenient, transparent, and secure platform with the primary goal of reducing server rental fees and encouraging user participation in POH staking.
For renters, it’s a way to reduce rental fees by up to 50% by having coins in PoH. For coin holders, it’s an opportunity to stake their coins in PoH and earn rewards without selling their assets.
This mechanism highlights Clore.ai’s commitment to building a user-focused ecosystem where everyone can effectively use CLORE both as a payment method and a source of income.
• Users can view all offers on the marketplace, including those seeking to rent coins and those offering coins for rent.
• Filters allow users to narrow down listings by type (rental or lending), amount of coins, rental duration, and cost.
• Users can create their own offers, specifying the amount of CLORE coins (minimum 500 coins), rental duration (from 1 hour to 90 days), and the annual rental rate (from 5% to 250%).
• An online calculator dynamically calculates the exact amount of coins users will pay or receive based on the entered details. For instance, if an owner wants to rent out 10,000 CLORE coins for 3 days at an annual rate of 250%, the calculator will show the precise earnings before the offer is published.
• Owners and Renters can manage their active offers, including editing, deleting, or accepting counteroffers from other users. Users can also track the status of their offers and receive notifications about important updates, such as when someone has accepted their offer or made a counteroffer.
• The marketplace supports negotiations, where users can propose counteroffers by adjusting the amount of coins, rental period, or rate. These negotiations allow for flexibility and mutual agreement between parties.
• Both Owners and Renters can close active orders, either upon completion or early, with a small fee applied for early closures to compensate the counterparty.
• Users can view the history of their completed orders, including detailed information such as the rental period, amount of CLORE coins, annual percentage rate, and total profit earned.
• The system allows users to repeat previously completed orders, with pre-filled parameters to streamline the process. Users can adjust any details before reposting the offer to the marketplace.
Download a wallet https://clore.ai/wallet or use our web wallet https://wallet.clore.ai/
Create a wallet
You will see something like this
Go to the “POH/Sign” section.
Fill in the details as shown in the screenshot, click “Sign,” and you’ll see the signature.
Create an account on if you don’t have one already.
Go to this page
Add your wallet by clicking on the red button
Fill in the details as shown in the screenshot and click “Submit.”
Done! You’re all set. Now you’ve attached your wallet to Proof of Holding.
Leasing GPUs for AI Development
Step 1: Platform Access
Users access the Clore.ai platform via the web interface
They log in using their credentials or create a new account if they are first-time users.
In the GPU marketplace, users select servers equipped with their desired GPUs rather than selecting just the GPU alone. The platform offers filters to search by GPU model, GPU count, CPU cores, RAM, reliability, network speed (upload/download), CUDA version, country, PCI width, and version. Users can choose between:
• Mainline Market: Offers GPUs without power limits, ideal for AI workloads.
• Efficient Market: Provides power-limited (PL enabled) GPUs for more energy-efficient tasks.
Once a server is selected, users can see the daily rental cost upfront. Payments are made from an internal wallet integrated into the platform, allowing users to pay using Clore Coin (CLORE) or Bitcoin (BTC).
After payment, users can choose from pre-configured system images suited for AI work, such as “Stable Diffusion” for machine learning, or a basic “Ubuntu Jupiter” image for general computing tasks. This helps users get started quickly without the need for manual software setup.
Once the payment is confirmed, users gain access to the server, enabling them to run AI models, simulations, or other computational workloads.
Renting GPUs for Cryptocurrency Mining
Miners enter the marketplace and filter listings to find servers suitable for cryptocurrency mining based on their hardware requirements (e.g., GPU model, count, network speed).
Once a server is selected, miners proceed with the leasing process, similar to the AI use case. After leasing, they can integrate the machine into their HiveOS account by providing their HiveOS credentials. All mining configurations, software installations, and monitoring are managed within HiveOS.
Step 3: Mining Earnings and Payments
Any cryptocurrency mined during the lease is credited directly to the miner’s wallet that was set in HiveOS.
Another Method for Adding Rigs to the CLORE Marketplace, Previously Mentioned
This method allows you to add servers via the HiveOS flightsheet and instantly upload multiple servers simultaneously.
IMPORTANT: Do not enable Clore Fleet on servers that are already added to the CLORE platform, as this will cause them to re-register with a new name. This can lead to malfunctions that require a full reinstallation starting from Hive OS.
If you’re looking to start earning by hosting your servers on Clore.ai, you’ve come to the right place! This manual will guide you through all the key steps—from initial setup to revenue optimization. You’ll learn how to properly connect your server, set up rentals, and ensure its stable performance.
The minimum profitability that your GPUs can bring is the mining income, calculated using a mining calculator, such as hashrate.no. This serves as a baseline for setting a rental price. Let’s consider an example for a mining rig with 8 x 3070 GPUs.
Go to the hashrate.no website and find the profitability for a single 3070 card, for example, $0.37. For a rig with 8 cards, the profitability would be:
This is the current profitability for an 8 x 3070 rig, which can be used as a starting point when setting the rental price.
1. Blockchain
A decentralized digital ledger that records transactions across many computers. In the Clore.ai ecosystem, blockchain technology ensures the transparency, security, and immutability of all transactions, fostering trust among users.
2. Clore Coin (CLORE)
The native cryptocurrency of the Clore.ai platform. CLORE is used to facilitate transactions, reward participants, and support the platform's overall economy.
3. Decentralization
A system where control and decision-making are distributed among multiple participants rather than centralized in a single entity. Clore.ai leverages decentralization to create a more equitable and resilient platform for GPU leasing and cryptocurrency transactions.
4. GPU (Graphics Processing Unit)
A specialized electronic circuit designed to accelerate the processing of images and videos. In Clore.ai, GPUs are leased through a decentralized marketplace, allowing users to access high-performance computing power for various tasks like AI development and cryptocurrency mining.
What is Clore?
Clore is a platform offering a marketplace for GPU leasing, allowing users to rent computing power for tasks like AI development and cryptocurrency mining.
How does Clore work?
Clore connects GPU owners with those needing computing power through a peer-to-peer marketplace. Transactions are facilitated with Clore Coin, ensuring security and transparency.
What is Clore Coin?
Clore Coin is the native cryptocurrency of the Clore platform, used for transactions and rewarding users for participation.
What is Proof of Holding?
Proof of Holding (PoH) is a system where users earn rewards for holding Clore Coins in their wallets, encouraging long-term engagement.
What type of GPUs does Clore offer?
Method One (Preferred)
The token file is located at /opt/clore-hosting/client/auth. For convenient copying, you can use a program with a file manager, such as Snowflake:
Ensure that your computer and the server are on the same local network.
Drag the auth file onto your computer or a flash drive.
1. Setting Up Your Server for Rentals: A step-by-step walkthrough on connecting your server to the platform, making it available for rent, including HiveOS integration and overclocking profile setup.
2. Calculating and Setting Rental Prices: Practical guidance on determining rental rates based on mining profitability or use in complex tasks, such as AI processing. We’ll explain how to set an effective price and configure automatic updates.
3. Managing Rentals: Learn how to set up a Telegram bot for real-time rental status notifications and server monitoring.
4. Reinstallation and Saving Settings: Simple and reliable methods for reinstalling drivers and retaining previous tokens if you need to update the system.
5. Earning Bonuses on Clore: An overview of the POH and MFP systems—key tools for boosting profitability and earning bonuses, including how to set up your servers for extra earnings.
Ready to get started? Follow the steps in our guide and take the first step toward earning with Clore.ai!


Clore provides a wide range of GPUs, including high-performance models suitable for AI, ML, and 3D rendering tasks. The platform supports various GPU models and configurations to meet diverse computing needs.
What payment methods does Clore accept?
Users can pay for GPU rentals using Clore Coin (CLORE) or Bitcoin (BTC), providing flexibility for different payment preferences.
What is the minimum and maximum duration for GPU leasing?
Clore allows GPU leasing for as little as one hour, with 720h maximum duration, offering flexibility for both short-term projects and long-term needs.
What is On-Demand Leasing?
On-Demand Leasing is a GPU rental option on Clore.ai that allows users to rent GPUs with a guaranteed performance for a specified duration. This type of leasing comes with a 10% fee, which can be reduced to 5% if you participate in the Proof of Holding (PoH) system by holding Clore Coins. On-demand leases are non-interruptible, meaning no other users can outbid your offer once you secure a rental. This option is ideal for tasks that require continuous and uninterrupted computing power, such as AI development, machine learning training, or rendering large projects.
What is Spot Leasing?
Spot Leasing is a GPU rental option on Clore.ai that offers users the ability to rent GPUs at a lower cost, with a 2.5% fee, which can be reduced to 1.8% through the Proof of Holding (PoH) system. Unlike On-Demand Leasing, Spot Leasing is interruptible, meaning that another user can outbid your offer and take over the rental. This option is ideal for tasks where continuous uptime isn’t critical, such as cryptocurrency mining or workloads that can tolerate interruptions. Spot Leasing provides more flexibility and cost savings for users who can handle the potential variability in access.


Click the Mass Onboard button.
In the window that appears, select HiveOS (Ubuntu is currently unavailable) and choose the rental pricing method:
Static: the price is set manually in BTC or CLORE, or in USD. For USD, prices in BTC and CLORE are automatically recalculated every two hours.
Mining Profitability Based: a multiplier is specified, applied to the idle mining profitability.
Set the prices, maximum rental duration, and configure additional options:
Enabling this option makes it impossible to adjust rental pricing through the CLORE website dashboard. To change the rental price, you need to update the Auth token used in the HiveOS flightsheet as follows: go to My Servers, click Mass Onboard, set the desired price, enable or disable the option, then copy the new Auth token and update it in the HiveOS flightsheet. If this option is disabled, you can change the rental price through the server settings on the CLORE website.
When this option is enabled, the overclocking configured in HiveOS will be applied to the server’s default overclocking profile on the CLORE platform. If overclocking is changed in HiveOS, it will automatically update in the default profile on the CLORE website. The server will be moved to the Power Efficient marketplace, as this action modifies the default overclocking profile. To disable this option, change the Auth token in the HiveOS flightsheet.
If this option is not enabled, when the HiveOS flightsheet is turned off or another flightsheet is used, the server will be disconnected from the marketplace and will appear offline on the CLORE website.
To enable this option, if it was not previously activated, update the Auth token. After this, the server will remain active on the marketplace even if the flightsheet is turned off or changed in HiveOS.
You can only disable this option using the command:
Next, go to HiveOS and create a new flightsheet:
Copy the text from the HiveOS Flightsheet field (a copy button is provided there).
In HiveOS, click Clipboard, then Wallet, add the Auth token, paste it, assign a name to the flightsheet, and click Create.
As a second miner, add what will be mined during idle time.
IMPORTANT: Never share your unique Auth token. This token allows others to control your servers.
Once setup is complete, the server will appear in the server list on the CLORE platform. The installation log can be viewed the same way as the mining log — in HiveOS Shell by running the command miner.
You can only disable this option using the command:

As mentioned earlier, you can directly specify a price in dollars in the server settings by enabling the corresponding feature. The price in BTC and CLORE will then be automatically recalculated and updated based on the exchange rate. If you prefer to set fixed values for BTC and CLORE, manually convert the calculated dollar amount.
Log in to your dashboard on clore.ai, and insert the calculated values into the On-demand pricing field. Set the Spot price slightly lower, then enable the rental.
Note: You can set the price above or below the baseline, depending on demand. Mining profitability in this case serves as a guideline.
If you not only have a mining rig but also a powerful GPU server capable of handling AI tasks, you can set the Spot price based on mining profitability, while the Rent price can be based on the anticipated cost of services.
CLORE Coin Bonus:
In addition to rental payments (e.g., $2.96), renters receive a bonus in CLORE coins. You can find the exact amount using the calculator on the website.
Remember to account for the commission: for Spot rentals, it’s 2.5%, and for other cases, it’s 10%. Thus, for a day’s rental, the result would be:

5. GPU Leasing
The process of renting out GPU resources to others who need computing power. Clore.ai provides a platform where GPU owners can lease their idle hardware to users needing temporary access to powerful GPUs.
6. Proof of Holding (POH)
A system within Clore.ai that rewards users for holding CLORE coins in their wallets. Unlike traditional staking, POH offers rewards immediately, providing incentives for long-term holding and contributing to the platform's stability.
7. Marketplace
In the context of Clore.ai, the marketplace is a decentralized platform where users can lease or rent GPUs and CLORE coins. It operates on a peer-to-peer model, ensuring transparent and direct transactions between users.
8. Emission Schedule
The planned release of CLORE coins into circulation over time. Clore.ai’s emission schedule is designed to ensure a controlled supply of coins, with block rewards decreasing gradually, contributing to the coin's scarcity and long-term value.
9. Staking
The process of holding a certain amount of cryptocurrency in a wallet to support the operations of a blockchain network, such as validating transactions. While not the primary mechanism in Clore.ai, staking is similar to the Proof of Holding system.
10. Spot Rental
A rental option on the Clore.ai platform where GPU resources are allocated to a specific user for a defined period, guaranteeing access to the leased hardware without interruption.
Fee: 2.5%, with Proof Of Holding it can be as low as 1.8%
11. On-Demand Rental
A flexible rental option where users can lease GPUs from the Clore.ai marketplace on an as-needed basis. This option is ideal for users with varying computational needs.
Fee: 10%, with Proof Of Holding it can be as low as 5%
12. Airdrop
A distribution of cryptocurrency tokens to a specific group of users, often used as a marketing strategy or as a reward for platform participation. Clore.ai periodically conducts airdrops to reward users, particularly those participating in the Proof of Holding system.
13. Compliance
Adherence to legal and regulatory requirements in the jurisdictions where Clore.ai operates. The platform is committed to maintaining full compliance with relevant laws, ensuring a secure and trustworthy environment for all users.
14. Tokenomics
The economic structure of a cryptocurrency, including its supply, distribution, and reward mechanisms. Clore.ai’s tokenomics are designed to ensure long-term sustainability and value growth for the CLORE coin.
15. Scalability
The ability of the Clore.ai platform to handle increasing demand without compromising performance. Scalability is a key focus for Clore.ai, ensuring that the platform can grow and serve a larger user base effectively.

Follow the installation instructions, and instead of using the command:
simply return the auth file back to the/opt/clore-hosting/client/directory
Reboot the server:
Method Two
Connect to the server via SSH or open Hive Shell and run the command:
The auth file will open in a text editor. Copy its contents and save it on your computer, for example, in a text editor.
Press F10 to exit the editor.
Reinstall Hive OS with the command:
After completing the installation, run the following commands in sequence:
A blank auth file will open in the text editor. Paste the previously saved content of the old file.
Press F2 to save and F10 to exit.
Reboot the server:

The server (or rig – these terms are nearly interchangeable in this context) must be equipped with NVIDIA GPUs, as AMD is currently not supported. The minimum required disk space is 32 GB; for reliability, it's recommended to use an SSD instead of a flash drive. A minimum of 8 GB of RAM is required, but 16 GB will provide greater stability. As for the CPU, the system can work with a Celeron on a 1151 socket, but for more efficient performance, consider using a CPU like the i7-6700.
Before proceeding, it is highly recommended to disable any overclocking, including the Power Limit (PL), and reset the GPUs to factory settings. Afterward, stress-test the system for stability by, for example, testing the GPUs using the kawpow algorithm and loading the CPU. Monitor temperatures and ensure everything is running stably.
If the system operates stably and temperatures are within a safe range, continue to the next step in the instructions. If temperatures are too high or errors occur, address these issues first – for example, by improving cooling or troubleshooting – and ensure stable operation before proceeding.
Method 1: Go to the "My Servers" section and click the "+Add Server" button. Enter the server's name and click "Next."
After adding, the server will be marked with a red circle, meaning it is inactive. We will activate it later, but for now, click on the created server to obtain a key – you will need it later.
If the system reports that git is missing, install it with:
Then retry the installation.
If you encounter a gpg error, use:
Afterward, rerun the installation.
Replace <token> with the key obtained earlier.
If an error indicates a missing folder or file, the installation likely didn’t complete correctly, and the clore-hosting folder was not created. In this case, repeat the installation.
Restart the rig, wait a moment, and refresh the marketplace page. If everything was set up correctly, the server will be marked with a green circle.
If you need to disable everything previously installed:
Disable the services:
Reboot the system:
To re-enable the services:
Enable the services:
Reboot the system:
To delete the token, use the command:
The file containing the token is located at:
The Proof of Holding (PoH) system is a cornerstone of Clore's ecosystem, designed to incentivize users to hold Clore coins ($CLORE) in their official Clore wallet. PoH stands out by offering immediate rewards without requiring a minimum holding period, making participation in the ecosystem both accessible and attractive. This system not only strengthens the network's stability but also fosters a vibrant and engaged community.
Hassle-Free Usage: Users are not required to transfer their funds to another wallet; participation involves merely signing a transaction from the Clore Desktop Wallet, making the process simple and secure.
No Blocking: Funds remain fully accessible, allowing users to withdraw or use them for other purposes at any time, ensuring liquidity.
Service Discounts: POH participants can enjoy significant savings, with up to a 50% discount on Clore services based on their CLORE holdings.
Optional Participation: Joining the POH system is entirely voluntary, offering an appealing opportunity to maximize the benefits of holding CLORE coins without any obligations.
No Penalties: Users have the flexibility to withdraw from the POH system at any time without facing any penalties.
Participation Guidelines:
To participate, users need to keep their Clore coins in the Clore Wallet and sign a transaction to ensure the safety and control over their assets, as they are not required to transfer their coins to the Clore platform.
You can also rent coins through the POH Marketplace and stake them in the POH section of your personal account. This allows you to earn rewards even without owning any coins, using rented funds.
Participants in the POH system receive discounts on Clore services, with the discount rates varying depending on the amount of CLORE coins held and the type of transaction. The discount structure is tiered, with higher holdings resulting in greater fee reductions:
On-Demand Fees: Start at 10.00% for 0 coins and decrease to 5.00% for holdings of 2,000,000 CLORE coins or more.
Spot Fees: Start at 2.50% and decrease to 1.80% as holdings increase.
This structure incentivizes larger holdings, making the POH system more beneficial for users with substantial CLORE balances.
The POH Marketplace
The POH Marketplace is an advanced feature within the Clore.ai ecosystem, allowing users to rent or lend their CLORE coins through a secure, peer-to-peer platform. This marketplace provides a dynamic environment where users can maximize the utility of their holdings or acquire additional coins for specific needs through flexible transactions.
User Roles in the POH Marketplace:
Owner: Any user with CLORE coins verified in the POH system who wants to rent out their coins.
Renter: Any registered user looking to borrow CLORE coins from owners.
Problem Clore.ai marks the rig as Docker Failure and keeps it offline, even though HiveOS is running.
Symptoms
A “Docker Failure” icon is shown in the Clore panel.
In the My Servers section, GPUs are displayed as 0x Unknown or the GPU count keeps changing.
Cause 1: Unstable GPU or Riser
Clore cannot initialize a GPU if it's disconnected or unstable. Even if HiveOS sees the GPU, Clore can’t use it → Docker Failure.
Solution: Restart and Check Hardware
Check the GPU or riser, make sure everything is securely connected.
Reboot the rig:
If the error returns after reboot, the issue is likely with the GPU, motherboard, or risers.
Clore hangs on startup if the directory /opt/clore-hosting/miniconda-env is corrupted.
Solution: Remove the environment and restart
If Clore doesn't start, it may be due to a frozen installation of dependencies (e.g. aiofiles, docker, etc.).
Solution: Reinstall dependencies
Recommended version: 27.5.1 Crashes are common with Docker 28+.
Solution: Downgrade Docker
After reboot, the system doesn't launch Docker and Clore Hosting → server goes offline.
Solution: Enable services on startup
nvidia-smi → No devices found)If HiveOS doesn't detect the GPU, Clore can't work with it → results in Docker Failure.
Solution: Reinstall the driver
This often helps if internal configs are broken.
Docker Failure almost always means that Clore doesn't see the GPU. In 90% of cases, the cause is either a disabled service or an unstable GPU/risers. Fix the root issue, enable services on startup — and your rig will stay online.
Let’s look at the server settings page. By clicking on a created server, you will be taken to a page where you can view the server information and its settings:
The page displays the server status, rental status (whether it’s rented or not), remaining rental time (if the server is rented), Backend version, and the MFP value (more on this below).
Server statuses can be as follows: “Operating Normally,” “CUDA Error,” “Docker Error.” There may also be a “Starting Up” status, which temporarily indicates that the system is determining which of the primary statuses is applicable.
CUDA Error indicates problems with drivers, GPU disconnections, often caused by riser faults or insufficient power supply.
PoH Staking is a new way to participate in the Clore ecosystem, allowing coin holders to earn stable passive income and gain additional benefits within the platform. By staking your CLORE, you keep full control of your funds without transferring them to third parties.
With PoH Staking you can:
Keep your funds safe in your own cold wallet
Earn up to 15% APY as a CLORE holder
systemctl stop clore-onboarding.service ; systemctl disable clore-onboarding.service ; systemctl stop clore-hosting.service ; systemctl disable clore-hosting.service ; systemctl stop docker.service ; systemctl disable docker.servicesystemctl stop clore-onboarding.service ; systemctl disable clore-onboarding.service ; systemctl stop clore-hosting.service ; systemctl disable clore-hosting.service ; systemctl stop docker.service ; systemctl disable docker.service0,37 * 8 = 2,96$2,664$ + 14,9775 CLORE/opt/clore-hosting/clore.sh --init-token <token>rebootmcedit /opt/clore-hosting/client/authhive-replace -y --stablecd /opt/clore-hosting/client/
touch auth
mcedit authhive-replace -y --stable


rebootrebootsudo systemctl stop clore-hosting.service
sudo rm -rf /opt/clore-hosting/miniconda-env
sudo systemctl start clore-hosting.servicesudo /opt/clore-hosting/clore.sh --reinstallsudo apt install \
docker-ce=5:27.5.1-1~ubuntu.22.04~jammy \
docker-ce-cli=5:27.5.1-1~ubuntu.22.04~jammy \
containerd.io -ysudo systemctl enable clore-hosting.service
sudo systemctl enable docker.service
sudo systemctl enable docker.socketnvidia-driver-update --forceFor both errors (CUDA and Docker), a simple reboot sometimes helps. If this doesn’t work, it may be necessary to check and replace risers, the power supply, or the SSD. In case of a Docker Error, it is recommended to reinstall the system, starting with Hive OS. If the problem persists, test the SSD with specialized software, reflash it, or replace it with another.
Below the server information are the rental settings. Here you can enable or disable rental. When enabled, the server becomes available on the marketplace; when disabled, it disappears from the rental list, which is convenient for maintenance or updates. You can also set the maximum rental duration and set the rental price (the rental price is specified for the entire server per 24 hours):
On-demand (rental price) in BTC,
Spot in BTC,
Rental price in CLORE,
Spot in CLORE.
On-demand rental allows the renter to use the server for the entire specified maximum period, as long as they have funds or do not end the rental themselves. Spot rental allows the rental to be overtaken by another user who offers a higher bid. In this case, the server can also be rented at the rental price by another user.
There are also two checkboxes:
Enable BTC — allows renting the server for BTC. When disabled, BTC will be unavailable.
Enable CLORE — allows renting the server for CLORE. When disabled, CLORE will be unavailable.
It is recommended to set the desired rental parameters (duration and prices, even in fields not activated by the checkbox) before enabling the rental (Available to rent), and then enable rental and click Apply. Be sure to refresh the page and check all settings.
There is also a checkbox, Calculate based on USD. When enabled, you can set the rental and Spot price in USD, and the BTC and CLORE prices will be automatically recalculated according to the current exchange rate (every 2 hours). This keeps the rental prices up-to-date with the USD exchange rate.
On the server list page, there is a Set GPU pricing button, which allows you to specify prices separately for each GPU. The server price will be calculated automatically based on the number of GPUs.
You can set On-demand and Spot prices in BTC and CLORE or enable Calculate based on USD to automatically recalculate prices in BTC and CLORE at the current rate.
Example: You have a server with 10 3070 GPUs, and you set the price for one GPU at $1. The total server price will automatically be set to $10 (10 GPUs * $1 = $10).
Another way to set the rental price is described in the following section.
If you scroll further down the server settings page, you’ll find the server rating displayed as an average rating (with the number of ratings in brackets). Stars visually represent the server’s average rating.
There is also a graph that shows the server’s rental duration at different periods, including rental prices. Various rental methods (Spot BTC, Rent BTC, Spot CLORE, and Rent CLORE) are marked with different colors, which can be seen in the legend below the graph.
Please note that the rental method designations below the graph are clickable. Clicking them toggles the graph display. Sometimes, the server is “rented” but does not display on the graph because the previous rental was, for example, in Rent CLORE, and the current one is in Spot BTC. In this case, to see the current status, switch the graph to the desired mode.
Another rental pricing method can also be activated here, as mentioned earlier. This feature is enabled by checking the box, after which you can set a multiplier for Rent and Spot prices. Then the hashrate and idle mining coin (when the server is not rented) from Hive OS will be applied. The system will assess your idle mining profitability, apply the specified multiplier, and set the resulting price for rental.
Example: If idle mining profitability is $4, and you set a multiplier of 1.2 for the Rent price, the final Rent price in BTC and CLORE will be $4.8 (1.2 * $4 = $4.8) according to the current rates.
This method works under the following conditions: the server must mine a coin through Hive OS, and this coin must be known and available in mining calculators. For example, if mining Qubic in idle mode, this method will not work since Qubic is not available in calculators.
Important: if you enable the auto-price function and click Apply, the rental will be automatically enabled, even if it was previously disabled, and the server will become available on the marketplace. The reverse is also true: if profitability cannot be assessed for some reason, the server will be hidden from the marketplace and will be unavailable for rental.
Here, you can see the default overclocking profile, which can be edited. Note: any changes to the default overclocking profile will move the server to the Power Efficient marketplace. Currently, the marketplace is divided into two segments: Mainline and Power Efficient.
If you modify the default profile and want to return the server to the Mainline marketplace, click the RESET button (only this button, do not click Apply). After a while, the server will reappear in the Mainline marketplace.
You can also add additional overclocking profiles and customize them as you wish. For each profile, you can specify an additional fee for its use or leave it blank to avoid additional charges for the renter. If the renter does not select any available profile (or none are available), the server will run with the default overclocking profile.
Important: specify offset values half as large as in Hive OS for both memory and core.
If the internet speed is displayed lower than actual after adding the server, or if you have upgraded to a higher provider plan, you can test the server’s speed. This feature is available once every two weeks.
To avoid server idle time between rentals, you can configure background mining. Three setup options are available:
Option 1: Select Docker image: cloreai/mining, set the algorithm, overclocking profile, and fill in the necessary data fields.
Please note that the selection of available algorithms is limited, and only the BZ miner is supported.
Option 2: You can configure any other miner and algorithm using a script. Enable the corresponding switch and paste the script text in the field. Scripts for launching other miners and information about them are available
Option 3: Launch a Flightsheet through Hive OS.
For this to work, be sure to select Docker image: HiveOS Flightsheet — without this, no flightsheet will start.

To participate in PoH Staking, you need a CLORE wallet — this can be the Web Wallet, Desktop Wallet, or a Tangem hardware wallet. Your CLORE coins that you plan to stake must be stored in this wallet. Any of these options give you full control over your funds and are suitable for staking.
Open your CLORE wallet (Web, Desktop, or Tangem) and go to the “POH/Sign” section. This section is used to create a digital signature required to add your wallet to PoH Staking.
Fill in the fields as shown in the screenshot and click “Sign.” After that, your signature will appear below — copy it for the next step.
Go to https://clore.ai/marketplace#proof-of-holding. On the page that opens, click Add Wallet (if you are using the Web or Desktop Wallet) or Add Tangem Wallet (if you are using the Tangem hardware wallet).
Fill in all the fields as shown in the screenshot and click “Submit.” After that, your wallet will be added to the PoH Staking system.
On the same page https://clore.ai/marketplace#proof-of-holding, scroll down to the Stake PoH section and click the small circle to the left of “Apply for Stake PoH.” If a green checkmark appears next to it, everything is done correctly — your staking has been successfully activated.
On the page https://clore.ai/marketplace#proof-of-holding, you will see a section called Accumulated Reward, where your earned PoS Staking rewards are displayed. To collect them, click the “Claim” button.
After clicking the checkmark, PoH Staking will not start immediately — activation takes up to 24 hours.
The reward for PoH Staking must be claimed manually.
The claim for the 1st day becomes available on the 8th day, for the 2nd day on the 9th, and so on. You can read more details here: https://docs.clore.ai/gpu-marketplace/clore.ai-reward-distribution-system
If you don’t claim your reward within 30 days, it will expire and become unavailable.
Instruction for Using Clore Fleet
To add any number of servers to Clore.ai, follow these steps:
Navigate to Clore Marketplace - My Servers.
Find and click the “Mass Onboard” button to start the process.
Select Your Operating System:
Choose your operating system. In this guide, we’ll be using HiveOS as an example (the steps are similar for a standard Ubuntu setup).
Select One of the Two Pricing Models:
a) Static Pricing
• You can set a specific value in Clore or BTC for your server rentals.
• Alternatively, you can enable automatic price recalculation in USD. For example, if you set a price of $10, the system will automatically adjust the rental price in Clore/BTC every two hours to match $10 in USD.
b) Mining Profitability-Based Pricing
• If you run another miner alongside Clore Fleet, such as mining Clore Coin, the system will monitor your server’s profitability.
• For instance, if your server earns $5 on a specific mining algorithm and you set a multiplier of x2, your rig will be listed on the marketplace for $10.
• If profitability changes, the marketplace price will be adjusted accordingly.
On-Demand Rental: The server is rented at a fixed price set by the host. It remains reserved for the client until the contract is canceled or their balance is insufficient to continue the service.
Spot Market: A quick transaction at auction-based rates. The minimum price is set by the host and is typically lower than the on-demand rate. The server is not reserved, and higher bids can outbid the current offer.
Select the Rental Period:
Choose the period for which you plan to rent out your rig. We recommend a minimum rental duration of 150 hours.
Choose Additional Options:
a) Override offer specifics on each machine reboot or change of configuration
• With this option, you won’t be able to edit server prices through the Clore.ai website after onboarding.
• Price adjustments will only be possible by changing your unique authorization token set as a wallet address on the HiveOS platform.
b) Use Overclocking and Power Limits from HiveOS for Orders by Default
• If selected, your Power Limit and core/memory clock settings will be copied from HiveOS.
• This option is crucial for miners who do not want to lease their rigs at full Power Limit.
• Note: Enabling this option will automatically list your server on the Power Efficiency Market on the Clore Marketplace, a specialized marketplace for mining servers.
c) Keep Clore.ai running even when miner is disabled
• This option allows you to remove Clore Fleet from the flight sheet an it will still be working in a background
• It’s designed for miners using custom settings that are not officially supported by HiveOS, such as mining Aleo.
• If you enable this option and later wish to remove Clore Fleet from your server, run the following command:
Start the Miner
To simplify, just copy the configuration displayed in the field on the left and use the Import from Clipboard feature when creating a new flight sheet in HiveOS.
Specify Your Unique Authorization Token as the Wallet
IMPORTANT: Never share your unique authorization token with anyone. This token allows others to control your servers.
If you chose “Keep Clore.ai running even when the miner is disabled,” you can set any FlightSheet you want; it won’t affect Clore Fleet.
Approved by Certik
Founder
The driving force behind Clore, Jakub boasts an extensive background in developing mining pools for Ethereum and other cryptocurrencies. His past experiences with IT infrastructure security in Czech companies have equipped him with the expertise needed to spearhead Clore. Serving not just as the CEO, Jakub is also the chief developer, visionary, and architect of the Clore project.
CEO
With a rich history as a miner, trader, and SEO specialist, John is a seasoned player in the crypto world, having been involved for over six years. His vast experience with blockchain startups is invaluable to Clore. As the CEO, he manages all operational facets, proving himself to be a versatile asset or, as some might say, a "one-man orchestra.
Head of product
An expert in Machine Learning, Loony has previously served as a Software & ML Engineer for various startups. At Clore, he takes the helm of product development. Despite his busy schedule, Loony is renowned for making himself available to the community, addressing queries across crypto chats. Some say he manages to squeeze 25 hours into his day!
CTO
As the CTO of Clore, Val is the mastermind behind the platform’s technical strategy. With an extensive background in software engineering and leadership roles in tech startups, Val is responsible for overseeing the development team and guiding the technical vision of Clore. His ability to foresee industry trends and adapt to emerging technologies ensures that Clore remains a leader in the crypto space, driving innovation and maintaining the platform’s competitive edge.
Desktop / Mobile Apps Lead
Corey leads the development of Clore’s desktop and mobile applications, ensuring a seamless and intuitive user experience. Previously, he created the Vidulum Wallet, showcasing his expertise in secure and efficient app development. His commitment to innovation and quality helps Clore.ai stay at the forefront of the GPU leasing marketplace.
Developer
Nik is a versatile developer with a knack for problem-solving and optimization. His previous work on high-performance applications and system integrations has equipped him with the skills needed to enhance Clore’s platform. At Clore, Nik focuses on refining the platform’s performance, ensuring that every operation runs smoothly and efficiently, contributing to an overall superior user experience.
Developer
Oksana is a highly skilled developer with a passion for coding that drives her to constantly push the boundaries of what’s possible. With experience in both frontend and backend development, she brings versatility and expertise to the Clore team. Her innovative solutions and deep understanding of blockchain technologies play a crucial role in advancing the platform’s capabilities, ensuring that Clore remains at the cutting edge of the industry.
Developer
Egor is a backend wizard at Clore, bringing years of experience in developing scalable systems and robust architectures. His deep knowledge of distributed systems and blockchain technology enables him to craft solutions that are both efficient and secure. Egor’s work behind the scenes ensures that Clore can handle the demands of a growing user base, making him a key contributor to the platform’s success.
Developer
Daniel is a frontend specialist who excels at transforming complex functionalities into user-friendly interfaces. With a background in UI/UX design and development, he ensures that every feature of Clore is not only functional but also intuitive and accessible. Daniel’s ability to blend design with functionality helps create a seamless experience for Clore’s users, making him a vital part of the team.
QA Engineer
Max is the guardian of quality at Clore, meticulously testing every aspect of the platform to ensure it meets the highest standards. With a background in software testing across fintech and blockchain industries, Max is adept at identifying potential issues before they reach the users. His attention to detail and commitment to excellence make him an indispensable part of the Clore team, ensuring a smooth and reliable user experience.
Web / Front
With a knack for creating intuitive and responsive web interfaces, Nikita has previously worked on diverse projects, from e-commerce sites to complex web applications. At Clore, he ensures that the platform is not just functional but also user-friendly, making every user's journey seamless and enjoyable.
Designer
An artisan in the realm of design, Vlad's previous endeavors include crafting visual experiences for startups and established brands alike. At Clore, he's responsible for the platform's aesthetic appeal, ensuring every pixel aligns with the company's vision and resonates with its users.
Developer
A coding prodigy, he has previously worked on developing intricate algorithms and backend systems for tech startups. At Clore, he's instrumental in refining the platform's backend mechanics, ensuring scalability and efficiency as the user base grows.
Developer
Known for his problem-solving prowess, he has been pivotal in several tech projects, focusing on optimization and system integrations. In Clore, he collaborates closely with the team, fine-tuning the platform's features and ensuring a smooth user experience.
Clore introduces the updated Proof of Holding (POH) system, version 2.0, which redefines earning rewards on the platform. This new system ties POH rewards directly to rented GPUs, ensuring fairer distribution and incentivizing participation in the GPU marketplace.
Key Updates to POH
• GPU-Based POH Limits
In POH 2.0, each GPU model has a maximum limit of Clore ($CLORE) coins eligible for rewards. Earnings are determined by the total capacity of rented and active GPUs. Excess coins above these limits no longer contribute to additional rewards, encouraging users to scale their GPU resources on the marketplace.
• Active and Rented GPUs Only
Only GPUs that are active, operational, and currently rented contribute to your POH limit. This ensures that rewards are allocated to users maintaining a functional and productive setup.
• Handling Excessive $CLORE
Accounts holding more $CLORE than their POH limit still benefit, but with reduced efficiency. Excess coins contribute to rewards at 50% of the regular rate, and the total reward capacity is capped at 2x the GPU-determined limit.
• Utilizing the POH Marketplace
Users with excess $CLORE are encouraged to lease them on the POH Marketplace. This peer-to-peer platform provides an opportunity to earn additional income while supporting the ecosystem’s overall functionality.
Reward Distribution Formula
The reward distribution for POH 2.0 is calculated based on four components:
15% of the reward depends on the server price.
15% of the reward depends on the Maximum Fair Price (MFP) for the server.
25% of the reward depends on the server price influenced by the total POH.
45% of the reward depends on the MFP for the server influenced by the total POH.
Important Update: The last 45% of the reward value is now capped to a maximum of 15% of the MFP per server, ensuring more balanced reward distribution and limiting excessive influence from the total POH.
Updated POH Limits by GPU Model
The following table outlines the GPU-specific POH limits. Each GPU model determines the maximum amount of $CLORE coins eligible for generating rewards:
NVIDIA H100: 96,000 $CLORE
NVIDIA A100: 72,000 $CLORE
NVIDIA L40: 72,000 $CLORE
NVIDIA A6000: 72,000 $CLORE
Example Calculation: Total POH Capacity
Let’s calculate the total POH limit for a user renting the following GPUs:
1. 3x NVIDIA RTX 4090 GPUs: 3 × 60,000 CLORE = 180,000 CLORE
2. 5x NVIDIA RTX 3060 GPUs: 5 × 18,000 CLORE = 90,000 CLORE
Total Account POH Limit: 270,000 CLORE coins.
Benefits of POH 2.0
Fair Reward Distribution: POH rewards are now directly tied to GPU performance, ensuring equitable participation.
Additional Income Streams: Excess $CLORE can be leased on the , allowing users to earn even when exceeding GPU-based limits.
Optimized Resource Utilization: By capping rewards per GPU, users are incentivized to scale their GPU operations strategically.
The POH 2.0 system enhances the Clore ecosystem by making reward distribution more efficient and transparent.
The server (or rig – these terms are nearly interchangeable in this context) must be equipped with NVIDIA GPUs, as AMD is currently not supported. The minimum required disk space is 32 GB; for reliability, it's recommended to use an SSD instead of a flash drive. A minimum of 8 GB of RAM is required, but 16 GB will provide greater stability. As for the CPU, the system can work with a Celeron on a 1151 socket, but for more efficient performance, consider using a CPU like the i7-6700.
Before proceeding, it is highly recommended to disable any overclocking, including the Power Limit (PL), and reset the GPUs to factory settings. Afterward, stress-test the system for stability by, for example, testing the GPUs using the kawpow algorithm and loading the CPU. Monitor temperatures and ensure everything is running stably.
If the system operates stably and temperatures are within a safe range, continue to the next step in the instructions. If temperatures are too high or errors occur, address these issues first – for example, by improving cooling or troubleshooting – and ensure stable operation before proceeding.
Listing Coins for Rent:
Role: Coin Owner/ Coin renter
Action: A user who holds Clore coins and has verified them in the Proof of Holding (PoH) system can list their coins for rent on the PoH marketplace. And verified user which wants to apply for a coins rent can add his offer to the marketplace.
Process:
The user navigates to the PoH marketplace and selects the option to list coins for rent.
Deployments on GigaSPOT can be only achieved by GigaSPOT API (), firstly you need to generate API key for your clore.ai account
This has been chosen, because GigaSPOT is tool for professionals and in such highly competetive envieronment it should make sence to only manage GigaSPOT orders by bots.
GigaSPOT does not offer port forwarding for it's orders. If you need to reach inner ports inside of container i can recommend implementing inside your workload
Order lifetime is determined by the amount of time, that hosting provider allowed the machine to be rented. Order lifetime is limited to 20 days. This data is returned in snapshot of the market described
sudo apt update && sudo apt upgrade -ysudo apt install -y curl git gnupg lsb-releasesudo -ibash <(curl -s https://gitlab.com/cloreai-public/hosting/-/raw/main/install.sh)apt install -y gitapt install gpg -y --allow-downgradesbash <(curl -s https://gitlab.com/cloreai-public/hosting/-/raw/main/install.sh)/opt/clore-hosting/clore.sh --init-token <token>sudo rebootsystemctl disable clore-hosting.service
systemctl disable docker.service
systemctl disable docker.socketrebootsystemctl enable clore-hosting.service
systemctl enable docker.service
systemctl enable docker.socketreboot/opt/clore-hosting/clore.sh --reset/opt/clore-hosting/client/auth


NVIDIA RTX 5090: 78,000 $CLORE
NVIDIA RTX 5080: 62,400 $CLORE
NVIDIA RTX 4090: 60,000 $CLORE
NVIDIA RTX 4080: 48,000 $CLORE
NVIDIA RTX 4070 Ti: 33,000 $CLORE
NVIDIA RTX 4070: 30,000 $CLORE
NVIDIA RTX 4060 Ti: 21,000 $CLORE
NVIDIA RTX 4060: 18,000 $CLORE
NVIDIA RTX 3090 Ti: 51,000 $CLORE
NVIDIA RTX 3090: 48,000 $CLORE
NVIDIA RTX 3080 Ti: 45,000 $CLORE
NVIDIA A5000: 42,000 $CLORE
NVIDIA A30: 36,000 $CLORE
NVIDIA A16: 36,000 $CLORE
NVIDIA A10: 30,000 $CLORE
NVIDIA RTX 3080: 30,000 $CLORE
NVIDIA CMP 170HX: 30,000 $CLORE
NVIDIA RTX 3070 Ti: 25,200 $CLORE
NVIDIA A4000: 25,200 $CLORE
NVIDIA RTX 3070: 24,000 $CLORE
NVIDIA L4: 24,000 $CLORE
NVIDIA RTX 3060 Ti: 23,400 $CLORE
NVIDIA GTX 1080 Ti: 21,000 $CLORE
NVIDIA RTX 3060: 18,000 $CLORE
NVIDIA A2000: 18,000 $CLORE
NVIDIA RTX 2080 Ti: 30,000 $CLORE
NVIDIA RTX 2080 Super: 27,000 $CLORE
NVIDIA RTX 2080: 24,000 $CLORE
NVIDIA RTX 2070 Super: 27,000 $CLORE
NVIDIA RTX 2070: 18,000 $CLORE
NVIDIA CMP 50HX: 18,000 $CLORE
NVIDIA RTX 2060 Super: 15,600 $CLORE
NVIDIA V100: 15,000 $CLORE
NVIDIA RTX 2060: 15,000 $CLORE
NVIDIA GTX 1660 Ti: 12,000 $CLORE
NVIDIA CMP 40HX: 12,000 $CLORE
NVIDIA GTX 1080: 12,000 $CLORE
NVIDIA GTX 1070 Ti: 11,400 $CLORE
NVIDIA GTX 1660 Super: 9,000 $CLORE
NVIDIA CMP 30HX: 9,000 $CLORE
NVIDIA GTX 1070: 8,400 $CLORE
NVIDIA GTX 1060: 7,200 $CLORE
Other GPU: 6,000 $CLORE


systemctl stop clore-onboarding.service ; systemctl disable clore-onboarding.service ; systemctl stop clore-hosting.service ; systemctl disable clore-hosting.service ; systemctl stop docker.service ; systemctl disable docker.serviceMethod 1: Go to the "My Servers" section and click the "+Add Server" button. Enter the server's name and click "Next."
After adding, the server will be marked with a red circle, meaning it is inactive. We will activate it later, but for now, click on the created server to obtain a key – you will need it later.
Choose the rig and open Shell. For those who rarely use HiveOS, images have been added below for clarity.
For M.2:
For SATA:
If the system reports that git is missing, install it with:
Then retry the installation.
If you encounter a gpg error, use:
Afterward, rerun the installation.
Replace <token> with the key obtained earlier.
If an error indicates a missing folder or file, the installation likely didn’t complete correctly, and the clore-hosting folder was not created. In this case, repeat the installation.
Restart the rig, wait a moment, and refresh the marketplace page. If everything was set up correctly, the server will be marked with a green circle.
If you need to disable everything previously installed:
Disable the services:
Reboot the system:
To re-enable the services:
Enable the services:
Reboot the system:
To delete the token, use the command:
The file containing the token is located at:
Where specify the amount of coins (minimum 500), the rental duration (minimum 1 hour, maximum 30 days), and the desired annual rental rate (between 5% and 250%).
The system calculates the potential earnings using an online calculator.
Upon review, the user publishes the offer, which then appears in the marketplace listings.
Searching for Coins to Rent:
Role: Renter
Action: A user looking to rent Clore coins can search the PoH marketplace for suitable rental offers.
Process:
The user browses the marketplace listings and uses filters to narrow down search results based on the amount of coins available, rental duration, and rental rate.
Upon finding a suitable offer, the renter can agree to the terms and initiate the rental agreement.
The rented coins are transferred to the renter's account for the agreed-upon duration, and the associated rental fee is deducted or credited based on the terms.
Creating a Custom Rental Offer:
Role: Renter/owner
Action: If a user cannot find an existing rental offer that meets their requirements, they can create a custom offer seeking to rent coins.
Process:
The user specifies the number of coins they wish to rent, the rental period, and the annual rental rate they are willing to pay.
This custom offer is posted to the marketplace, where it can be seen by coin owners.
Interested coin owners can then respond by agreeing to the rental terms, effectively creating a new rental transaction.
Managing Active Rentals:
Role: Coin Owner or Renter
Action: Both parties can manage active rentals through the PoH marketplace interface.
Process:
Coin owners can monitor which of their coins are rented out, track the rental duration, and view their earnings in real time.
Renters can see the duration remaining on their rented coins and manage how they utilize these coins during the rental period.
Both parties receive notifications regarding the status of their rentals, including the start and end of the rental period and any changes in rental conditions.
Ending a Rental Early:
Role: Coin Owner or Renter
Action: Either party can end the rental agreement early, subject to conditions.
Process:
If a coin owner needs to regain control of their rented coins before the agreed period ends, they can terminate the rental. A small penalty fee (3-5% of the daily profit) is charged for early termination.
Renters can also decide to end the rental early if their needs change. They will stop paying the rental fee from the moment the coins are returned.
Early termination must be confirmed by both parties, ensuring clear communication and agreement.
Receiving and Reviewing Notifications:
Role: Coin Owner or Renter
Action: Users receive notifications about the status of their offers and rentals. And both users can communicate with each other via messenger
Process:
Notifications include confirmations of successful listings, rentals, and terminations.
Users are informed when someone takes up their rental offer, or if a counter-offer is made.
System-generated alerts help maintain transparency and ensure all parties are informed about the state of their rental transactions.
Reviewing Rental History:
Role: Coin Owner or Renter
Action: Users can view the history of their rental activities.
Process:
The marketplace provides a detailed history section where users can review all completed rental transactions, including past offers, amounts, rental rates, and durations.
Users can access detailed reports on each transaction, helping them track performance and optimize future rental strategies. Users can repeat the offer to publish it again to the marketplace.

You need to firstly cache image from dockerhub onto CCR, there are currently limit posed (600MB) per image, this makes it feasible for PoW type workloads, this is to make sure that GigaSPOT can be fair to everyone ,to not be slowed down by caching large images and allow vast majority of machines to connect to GigaSPOT. If you have workload that could benefit from GigaSPOT, can't be fited into 600MB and you are expected to spend over 20000$/month on GigaSPOT please message [email protected]
⚠️ The 600MB limit is for uncompressed image, so after you build your image you can see the uncompressed size in docker image ls
Image on CCR has TTL (Time To Live) default of 30 days, the counter resets on deploying new GigaSPOT order with the CCR image, this is to automatically clean up CCR of no longer needed images.
Some images created by CLORE.AI are already cached on our machines, so they can be utilised by clients on GigaSPOT marketplace
⚠️ Base image cannot be guaranteed to stay the same for all the time, the images will be automatically updated in the future to newer versions of it's base image. The future changes to base images by clore.ai team will be tried to be to not break any workloads, but still your workload might lose support, when let's say base images get upgraded to newer ubuntu in years down the line. Base image updates will be mentioned in clore.ai socials before happening, so if you are following you will be updated
This image has CCR ID a3f9c4d7e5b088d8a0bff880
Currently using base image cloreai/jupyter:ubuntu24.04-v2 with source at https://gitlab.com/cloreai-public/containers/jupyter
With this image deployed inside the container you will have 650MB of free space by default to setup your workload
This image allows you to deploy your workloads by specifying bash script that will be downloaded on first start of the image
Order creation API call with this example, bidding at 13 CLORE/day with no OC enforced, power limit at 350W
This image uses ENV variable DELEGATED_ENTRYPOINT as source for where to download the script. The script will be once downloaded and will be runned on every start of the container, so make sure you are designing you script to be able to be killed at any time, even in initial deployment. GigaSPOT is high paced trading environment, where your order might be outbid even during running initialization phase of your script, so robust code is really helpful.
Example of api call to deploy
You can see in the example a ENV WORKER_NAME which is used to configure worker name for the miner, because it's passed to the miner here
This eample did not work in reality when deployed on machine #40329 - read more in Navigating Russian Censorship
This image has CCR ID c9a4e2f6b7d488d8f0bab0ff
Currently using base image cloreai/hiveos:0.3 with source at https://gitlab.com/cloreai-public/containers/hiveos
With this image deployed inside the container you will have 650MB of free space by default to setup your workload
This image is used to deploy HiveOS on Clore GigaSPOT, such deployment is possible, but not really recommended for large scale operations, while it's great for debugging because of Hive Shell also can be useful for beginers to setup workloads on GigaSPOT, because of it's UI.
For deployment of HiveOS you need to create HiveOS account and use for each rented machine unique Rig ID and Password which are fields generated by HiveOS for connecting machines
These fields are inputed with ENV, look at this example:
Also when running HiveOS, don't forget that on some machines in Russia, connections to some pool endpoints might be restricted, it's better to read Navigating Russian Censorship
There can only be 8 orders (bids) per gigaspot market (machine). If more orders are present per machine, order with lowest profitability is canceled on CLORE.AI Billing interval
While GigaSPOT is a powerful tool, it's best suited for linux users and people with deep understanding what can happen in such environments, can imagine the potencial risks.
It's best practise to mandatory in my opinion to verify outputs of the machine, your system should be ideally verifying processing speed / hashrate of machines, ideally have a list of bad performing machines, hosts to prevent financial losses.
GigaSPOT is offered as is, in no cases including GPUs being missreported no refunds will be issued. It's clients responsibility to validate machine performance and attain black list.
This article goes into only creating gigaspot orders, to edit them, modify overclocking settings, you should look into GigaSPOT API Documentation
With majority machines on CLORE.AI being from Russia, it's beneficial to read Navigating Russian Censorship


Stake external wallets to prove long‑term ownership of CLORE. The sum of all staked wallets (minus lent + plus borrowed balances) is your POH stake.
POH Activation (Stake POH): After connecting the wallet, a 24-hour warm-up period begins. → A timer will be displayed in the interface.
Reward Accrual: Rewards are accrued every minute and recorded in a special daily buffer.
Reward Unlock: Each daily reward becomes available 8 days after it is accrued. → A Claim button will appear on the POH page to receive it.
Reward Unlock SequenceRewards are unlocked gradually:
Reward for Day 1 becomes available on Day 8
Reward for Day 2
The UI derives APY by projecting today’s minute income over a year assuming constant totals.
Global staked POH graph ().
Personal POH income chart in the user cabinet.
MFP (Maximum Fair Price) is Clore’s internal quality score for each server (range 1 – 65). The platform calculates it automatically, taking into account every key aspect of the machine: CPU cores/threads, GPU model and count, PCI‑Express version and bus width, internet bandwidth, and disk read/write speed.
Protecting this score is optional: you lock 1 000 CLORE for each MFP point you wish to back. If you choose not to lock, the marketplace assumes MFP = 0 and you receive only the tenant’s payment.
When you do lock, the protected MFP unlocks company‑paid rewards from the MFP pool according to the tier rules below.
Reward distribution by tiers (Tier 1 and Tier 2):
There are two levels of participation in the system:
Tier 1 — if you lock from 0% to 100% of the required amount of coins.
Tier 2 — if you lock from 100% to 500%.
The reward pool is split evenly:
50% of the reward pool goes to Tier 1
50% goes to Tier 2
The maximum reward per tier is up to 100% of the server rental price.
How the distribution works:
All participants in Tier 1 share 50% of the pool. It’s easier to enter, so there are more people.
Getting into Tier 2 is harder (you need to lock 2–5 times more), but there’s less competition — the same 50% is shared among fewer participants.
Since each tier has a hard cap, any amount exceeding the limit is burned and permanently removed from circulation, reducing the total token supply.
Example: if a server rents for 10 USD/day, the maximum possible reward is 30 USD/day (10 USD from the renter + up to 10 USD from Tier 1 + up to 10 USD from Tier 2).
Rewards are distributed exclusively among servers with active MFP lock and current rental. Servers that are not rented are excluded from bonus calculations.
Click Lock MFP at the top of My Servers to lock multiple servers in one action; you are not required to open each server individually.
1. Locking MFP → Active Status
Delay: 24-hour warm-up
🛈 Reward accumulation begins and unlocking becomes available.
2. Unlocking Tier 2
Delay: 14 days
🛈 The entire Tier 2 balance is unlocked.
3. Unlocking Tier 1
Delay: 7 days
🛈 Becomes available only after Tier 2 unlocking is complete.
4. Idle Server Removal
After 28 days of inactivity
🛈 Funds are automatically returned to the balance.
The platform sets protected MFP = 0 for reward purposes. You continue to rent the server and collect tenant payments, but receive no company‑paid reward. There are no penalties or feature restrictions.
“Commitment deserves recognition”
The redesigned reward engines are built to amplify the upside for those who actively believe in Clore’s future while keeping the door open for everyone else.
In short, we want to reward conviction—both the conviction to hold CLORE and the conviction to invest in capable hardware—while maintaining a fair, penalty‑free experience for every participant.
Stake POH for passive token income; claim starts on day 8 and expires on day 30.
Lock MFP to boost server earnings up to +200 % of rent;
Skipping the lock simply forfeits the company reward – no penalties, no hidden limits.
This rework keeps the miner/developer emissions intact while dividing the marketplace budget into two transparent, purpose‑driven engines that reward long‑term token holders and quality hardware hosts alike.
Clore Partners is a premium system designed to match top-tier hardware providers with large-scale renters such as Vast.ai and other high-demand platforms. If you’re a company or service provider that frequently rents out a significant volume of compute resources, Clore Partners offers a dedicated and reliable solution.
Clore Partners provides several key benefits for server owners (hosters):
Your income is always tied to the US dollar, not the fluctuating $CLORE price.
You earn a fixed dollar value, no matter what happens on the market.
• Example: If your rig is rented for $10/day:
• At $CLORE = $0.04 → you get 250 CLORE
• At $CLORE = $0.02 → you get 500 CLORE
📌 You always get the full dollar equivalent.
In addition to your stable base payout, you receive bonus rewards in $CLORE on top.
• Base rewards range from +10% to +30%
• If you have MFP Tier 1 and Tier 2 locked, your bonus can reach up to +100%
Example:
If your daily income is $10, you can automatically receive up to $10 extra in $CLORE.
💡 This means your total income can potentially double without any extra effort.
Clore Partners is tailored for integration with large platforms like Vast.ai, which means your rigs are prioritized for:
• Bulk rentals
• Longer sessions
• More consistent usage
Partner rigs are prioritized in the rental queue.
That means:
• Faster matching
• Higher rental frequency
• More revenue over time
There is zero downside to enabling Clore Partners on your server:
• It does not prevent normal rentals
• It does not reduce your visibility
• It simply adds another layer of earning potential
This results in fewer idle hours and more total uptime.
To be eligible to supply your servers to Clore Partners, please make sure your rigs meet the following conditions:
🔘 Step 1: Enable Clore Partners
• In your rig settings on the Clore dashboard, make sure to click the “Apply to work with Clore Partners” button for each server.
💻 Step 2: Hardware Requirements
✅ Mandatory Specs
• GPUs: RTX 3070, 3090, 3090 Ti, 4090, 5080, 5090, or NVIDIA A4000, A5000, A6000
• CPU: Minimum 16 threads
• RAM: Minimum 32 GB
• Network Speed: Minimum 100 Mbps
• Storage: Minimum 500 GB SSD
• CUDA Version: At least 12.2
⭐ Recommended for Higher Rent Probability
• CPU: 32+ threads
• Power Limits: Full PL required (rig must be listed in the Mainline Marketplace)
• RAM: 64+ GB
• Internet: 500+ Mbps
• SSD: 1.5+ TB
• CUDA: 12.4+
• Reliability 99.5%+
• PCIe Interface: At least x4 lane with PCIe version 3.0 or higher
Once you click the “Apply to Clore Partners” button in your server settings:
• ✅ We will automatically set the rental prices for you.
These prices may slightly differ from the ones listed in the table, as they are adjusted to match the needs and budgets of large-scale renters. Rest assured — pricing is always fair and market-aligned.
• 🕒 The minimum rental duration will be set automatically — starting from 14 days or more.
This ensures longer rental sessions, reduced downtime, and more consistent income without frequent renter switches.
📌 Everything is handled automatically — you don’t need to configure anything manually.
If you run a platform or business that regularly requires $20,000/month or more in rental volume, you may qualify to become a Clore Partner renter.
To get started, simply reach out to us at:
Our team will evaluate your needs and initiate the onboarding process to provide you with access to our partner-level server supply.
growpart /dev/nvme0n1 4
resize2fs /dev/nvme0n1p4growpart /dev/sda 4
resize2fs /dev/sda4systemctl disable clore-hosting.service
systemctl disable docker.service
systemctl disable docker.socketrebootsystemctl enable clore-hosting.service
systemctl enable docker.service
systemctl enable docker.socketreboothive-replace -y --stableselfupgrade --force
apt update
apt upgrade
apt autoremovenvidia-driver-update --forcerebootsudo -ibash <(curl -s https://gitlab.com/cloreai-public/hosting/-/raw/main/install.sh)apt install -y gitapt install gpg -y --allow-downgradesbash <(curl -s https://gitlab.com/cloreai-public/hosting/-/raw/main/install.sh)/opt/clore-hosting/clore.sh --init-token <token>reboot/opt/clore-hosting/clore.sh --reset/opt/clore-hosting/client/authcurl -X POST \
-H 'auth: NXj2bHUXHwzvd5-Lm6UfvgGtnNwaHxLu' \
-H 'Content-Type: application/json' \
-d '[
{
"currency": "CLORE-Blockchain",
"image": "a3f9c4d7e5b088d8a0bff880",
"renting_server": 40329,
"price": 13,
"oc": [
{
"pl": 350
}
],
"env": {
"DELEGATED_ENTRYPOINT": "https://gitlab.com/cloreai-public/gigaspot-examples/ubuntu-base-mining/-/raw/main/example-clore-blockchain.sh",
"WORKER_NAME": "clore-gigaspot-40329"
}
}
]' \
'https://api.clore.ai/v1/create_gigaspot_orders'curl -X POST \
-H 'auth: NXj2bHUXHwzvd5-Lm6UfvgGtnNwaHxLu' \
-H 'Content-Type: application/json' \
-d '[
{
"currency": "CLORE-Blockchain",
"image": "c9a4e2f6b7d488d8f0bab0ff",
"renting_server": 40329,
"price": 13,
"oc": [
{
"pl": 350
}
],
"env": {
"rig_id": "10452701",
"rig_pass": "UTA2xoxo"
}
}
]' \
'https://api.clore.ai/v1/create_gigaspot_orders'


$1.224 + ~$0.22 (от Clore Rewards)
A5000
$2.040 + ~$0.37 (от Clore Rewards)
A6000
$6.120 + ~$1.10 (от Clore Rewards)
GPU
Daily Revenue
RTX 3070
$0.714 + ~$0.13 (от Clore Rewards)
RTX 3090
$1.836 + ~$0.33 (от Clore Rewards)
RTX 3090Ti
$2.448 + ~$0.44 (от Clore Rewards)
RTX 4090
$3.060 + ~$0.55 (от Clore Rewards)
RTX 5080
$2.448 + ~$0.44 (от Clore Rewards)
RTX 5090
$4.488 + ~$0.81 (от Clore Rewards)
A4000
Unstake POH: Disconnecting the wallet from POH is instant. → All future reward accruals stop immediately.
Reward for Day 3 — on Day 10
And so on accordingly
Align rewards with belief
• POH Staking pays holders who lock coins long‑term.• MFP Lock multiplies revenue for hosts who stake CLORE behind their hardware.
Promote long‑term stability
Any payout above tier caps is burned, reducing supply and countering inflation.
Keep entry barriers low
Users who choose not to stake or lock still rent or host normally; they simply forgo the extra company bonus—no throttles, no hidden fees.
Reward real performance
MFP score captures CPU, GPU, PCIe, network, and disk metrics, so the highest‑quality servers unlock the largest company boosts.
Strengthen token utility
Locking CLORE converts a passive balance into productive capital that powers the marketplace, creating organic demand for the token.


minute_pool = block_emission_per_min × 0.20
user_reward_per_min = user_staked / total_staked × minute_pool
MFP (Maximum Fair Price) is an internal quality score for every server on the Clore.ai network. The algorithm considers all key hardware characteristics: GPU model and count, PCI Express version and lane width, internet-link speed, CPU model, and many other metrics. The more powerful and stable the configuration, the higher the MFP. The current upper limit is 65.
A score alone is not enough—the network must see that the owner believes in the server and is willing to back its quality with coins. A host therefore locks CLORE in MFP Lock, confirming the server’s MFP and unlocking access to a share of each block reward.
With a reward of 313 CLORE per block and 1 440 blocks per day, each basket (Tier 1 and Tier 2) receives 45 072 CLORE per day.
Base rule: 1 MFP = 1 000 CLORE.
For each basket k ∈ {T1, T2}:
A server cannot receive from each tier more than its daily rental price. For a rent of 300 CLORE / day the maximums are:
Together with rent, a server rented out for 300 CLORE can earn up to 900 CLORE per day.
Anything above these limits is automatically sent to a burn wallet.
Lock – The host locks the desired amount; 24 h later the server starts receiving rewards.
Unlock (all-or-nothing). When “Unlock” is pressed two linear timers start at once:
After transit the funds are automatically moved back to the system wallet.
(all examples use a server rented out for 300 CLORE / day)
150 servers — full Tier 1 (30 000 CLORE)
150 servers — half Tier 1 (15 000 CLORE)
150 servers — full Tier 1 + half Tier 2 (30 000 + 60 000 CLORE)
50 servers — full Tier 1 + full Tier 2 (30 000 + 120 000 CLORE)
* T2 payouts are capped at 300 CLORE / day. † Total = (T1 payout + T2 payout + rent 300 CLORE).
Pool outcomes (45 072 CLORE / day each):
Tier 1: fully distributed — nothing burned.
Tier 2: 42 043.2 CLORE paid → 3 028.8 CLORE burned.
Even with 500 servers and strong competition, part of Tier 2 remains unclaimed and is burned daily, maintaining token scarcity and enhancing reward value.
If the server configuration changes (GPUs added/removed, CPU swapped, etc.), the score is recalculated:
MFP rises → any already-locked free coins automatically fill Tier 1 then Tier 2.
MFP falls → excess stake moves to unused lock balance. unused lock balance can be unlocked after 10 days.
Two-factor authentication. Always enable 2-FA—it is the first and most important defense layer.
Cold & hot wallets. Most assets are stored offline; hot wallets hold only the operational minimum.
2.5 years incident-free. The platform has never been hacked; in any force-majeure the company covers user losses.
Unlock timers. Even if an attacker initiates a withdrawal, the minimum 7-day period gives the owner time to react.
Transparent economics. Higher hardware quality and higher stake mean a larger share of the pool—no hidden tricks.
Guaranteed break-even. A full Tier 1 covers the rental price; a filled Tier 2 doubles that bonus.
Clear ceiling. A server rented for 300 CLORE can earn up to 900 CLORE/day—a straightforward cap.
Network self-regulation.
MFP Lock is more than a “lock coins” button. It rewards investment in quality hardware, stabilises the network economy, and turns hosting on Clore.ai into a predictable, secure revenue stream.
If you locked MFP and attempted self-renting (renting your own server from another account): • Both accounts are permanently banned. Unban is impossible. • All related GPUs (UUID) are blacklisted. • All funds on the account are blocked; no refunds will be issued.

45 072 − 30 000 = 15 072
C. 99 × 65 000 and you 1 000
0.01538 %
6.93
0
≈ 307
pool burns ≈ 15 359
D. You are alone, Stake = 325 000 (T1 + T2 max)
100 %
300
300
900
90 144
≈ 353
Full T1 + ½ T2 (150)
30 000
60 000
106.05
180.29
≈ 586
Full T1 + T2 (50)
30 000
120 000
106.05
300.00
≈ 706
Security. Linear timers, 2-FA, and cold storage protect the stake even if an account is compromised.
POH staking
20 %
Users without servers can simply stake their coins here
MFP Lock
20 %
Split equally: Tier 1 (10 %) and Tier 2 (10 %)
Tier 1
≤ 100 % MFP
≤ 20 000 CLORE
Tier 2
100 – 500 % MFP
up to 80 000 CLORE more (total 100 000)
MFP Lock Tier 1
300 CLORE
MFP Lock Tier 2
300 CLORE
Total from MFP Lock
600 CLORE / day
Tier 1
7 days
Full Tier 1 stake
Day 7
Tier 2
14 days
Full Tier 2 stake
Day 14
Scenario
T1 pool share
T1 payout
T2 payout
Total
Burned
A. You are alone, Stake = 65 000 (T1 = 100 %)
100 %
300
0
600
45 072 − 300 = 44 772
B. 100 hosts, each 65 000
1 %
300 (max)
0
Group (count)
Stake T1 / server
Stake T2 / server
T1 payout / server
T2 payout / server*
Total / server†
Full T1 (150)
30 000
—
106.05
0
≈ 406
Half T1 (150)
15 000
—
53.03


600
0
hosting is currently available only for people running their machines from HDD/SSD
USB flash drives are not permited
RTX 4090
RTX 4080 Super
RTX 4080
RTX 4070 Ti Super
Clore Bare Metal are physical (non-virtualized) servers with full root access, no sharing, and no power limits. Suitable for AI/ML, HPC, 3D rendering, and any heavy workloads.
Available GPUs (examples): B200, H100, H200, A100, L40S, RTX 5090, RTX 4090, etc. Locations (start): USA, Japan, Hong Kong, and others SLA: Tier 3 and above data centers, target uptime 99.99%.
You get a whole physical machine (CPU, RAM, disks, network, GPU).
Full root access/SSH and, when available, IPMI/KVM for OS reinstallation.
No PL limits / isolating layers — performance matches the hardware.
Differs from container-based rentals (HiveOS/Docker) in that resources are not shared.
2.1 Data center
Minimum Tier 3 (Uptime Institute or a recognized local equivalent).
Documents: DC letter/certificate, redundancy description (power N+1/2N, cooling, network).
SLA 99.99% with a 24/7 NOC.
Compliance with fire safety standards; availability of emergency procedures (RPO/RTO).
2.2 Hardware base (minimum)
CPU: from 64 threads.
RAM: from 128 GB (256 GB+ recommended for multi-GPU/HPC).
Storage: NVMe SSD ≥ 1 TB, throughput ≥ 1 GB/s (RAID1/10 recommended for system and data).
Network: ≥ 1 Gbps symmetric (10 Gbps preferred, L2/L3 redundancy, static IPv4; IPv6 is a plus).
2.3 High-performance interconnects (preferred)
InfiniBand (EDR/HDR/NDR) for distributed training/HPC.
NVLink/NVSwitch — desirable for multi-GPU within a node.
In case of hardware failure — one-for-one replacement (identical or strictly equivalent configuration) with no SLA degradation.
Mandatory stock of spare parts / “hot” spares.
Disk sterilization between rentals: blkdiscard/secure erase/1-pass zero/TRIM (logging).
IPMI isolation, closed mgmt perimeter, ACL/DDoS profile.
OS images — vetted, with up-to-date microcodes/patches, support for NVIDIA drivers.
Minimum rental term: from 1 month.
Pricing: price lists competitive by geolocation (accounting for traffic/electricity/VAT costs).
API integration is mandatory/desired (depending on volume) for auto-provisioning, extensions, and monitoring.
OS: Ubuntu 22.04/24.04 LTS, Rocky/RHEL 9; on request — Windows Server (with licensing).
GPU stack: NVIDIA 550.xx+ (or those recommended for specific GPUs), CUDA 12.2/12.4+.
Management: SSH (required), IPMI/KVM (preferred) with temporary accounts for the renter.
Containerization: Docker/Podman on request; Kubernetes — allowed if a master is provisioned within the same DC.
Application & verification:
Legal entity, official contract with a Tier 3+ DC, SLA 99.99%, 24/7 NOC.
Document package: Tier/equivalent certificate, SLA, fire safety, redundancy scheme.
Acceptance tests: public IPv4, screenshot/access to IPMI (KVM), iPerf3/disk performance results.
Minimum 1 Gbps (symmetric), preferably 10 Gbps with redundancy.
Public IPv4, rDNS support on request; IPv6 is desirable.
Basic ACLs, anti-DDoS profile, dedicated mgmt-VLAN for IPMI.
For InfiniBand — direct L2 segmentation within the rack/room and OFED availability.
Multi-GPU LLM training: 8×L40S/NVLink or an IB cluster of A100/H100/H200 nodes.
Video rendering: 4×RTX 4090/5090 with local NVMe cache and 10 Gbps egress.
HFT/trading: low latencies, CPU 64–128 threads, RAM 256–512 GB, NVMe RAID1 and 10 Gbps network.
How is Bare Metal different from container rental? Bare Metal is entirely your physical machine (CPU/RAM/Disk/Net/GPU). In container rental, resources are shared and you work in an isolated environment.
Is IPMI required? Preferred. It speeds up OS reinstallation and provides KVM access, especially for network/SSH issues.
Can nodes be interconnected over IB? Yes, InfiniBand is encouraged for distributed training/HPC. Specify the IB bandwidth/type in the SKU.
What’s the minimum for GPUs? L40S / H200 level and above, or an equivalent resilient to heavy workloads (B200, H100, A100, etc.).
What if the server “goes down”? The provider must promptly deliver an identical replacement with no degradation (SLA 99.99%).

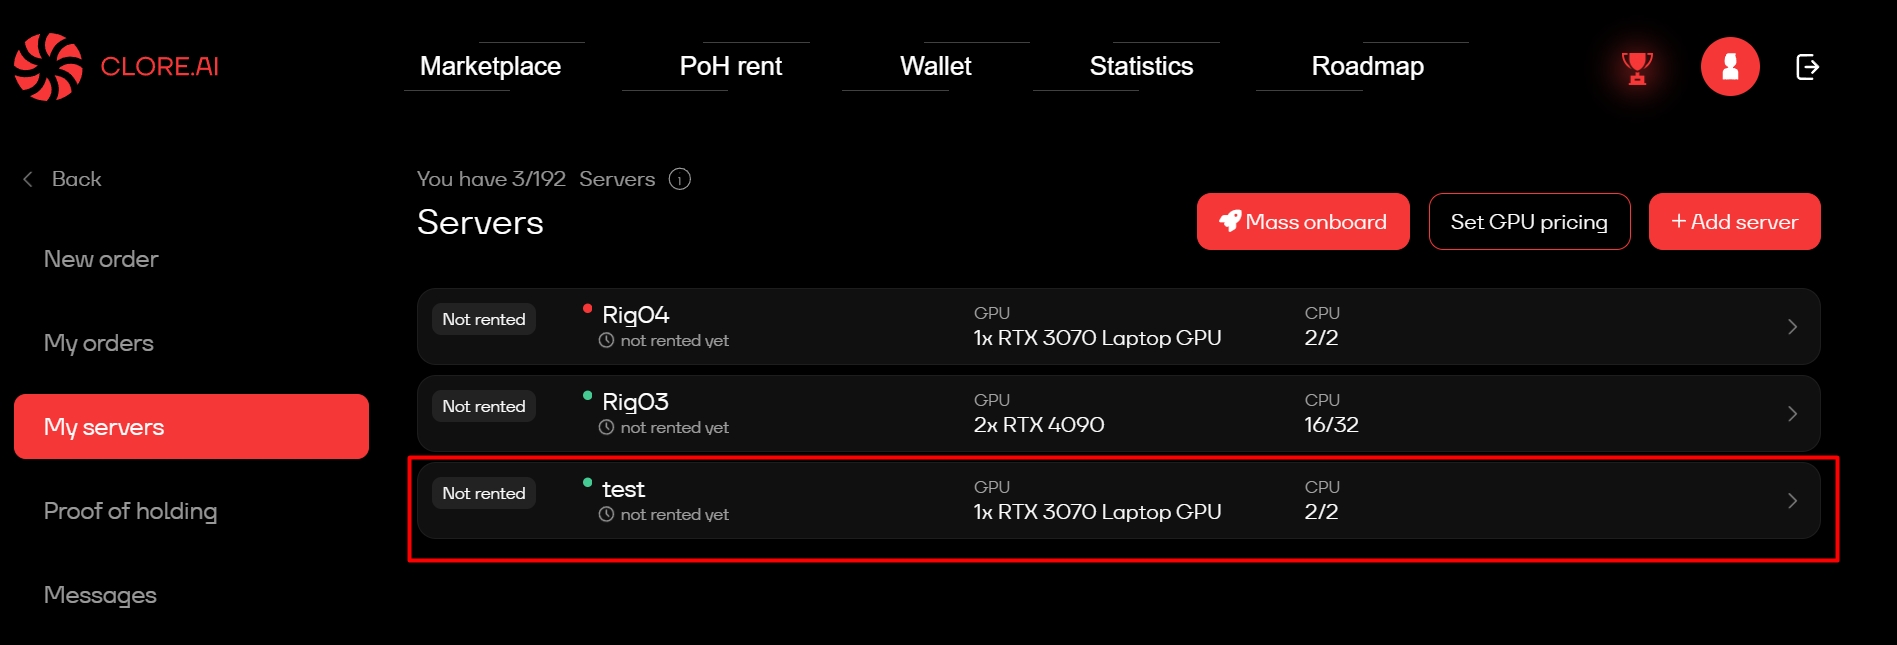
RTX 4070 Ti
RTX 4070 Super
RTX 4070
RTX 4060 Ti
RTX 4060
RTX 3090 Ti
RTX 3090
RTX 3080 Ti
RTX 3080
RTX 3080 Laptop GPU
RTX 3070 Ti
RTX 3070 Ti Laptop GPU
RTX 3070 Laptop GPU
RTX 3070
RTX 3060 Ti
RTX 3060 Laptop GPU
RTX 3060
RTX 3050
RTX 2080 Super
RTX 2080 Ti
RTX 2080
RTX 2070 Super
RTX 2070 Ti
RTX 2070
RTX 2060 Super
RTX 2060
CMP 90HX
CMP 70HX
CMP 40HX
CMP 30HX
GTX 1660 Super
GTX 1660 Ti
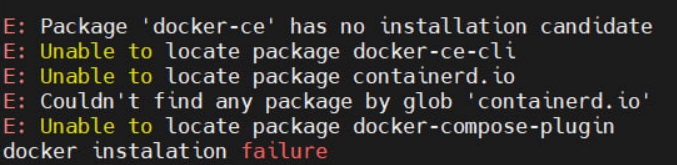

Legal entities only. Home/office “server rooms” are not accepted.
GPU (tier): L40S / H200 and above or equivalents resilient to heavy workload: B200, H100, H200, A100, L40S, RTX 4090/5090 (server A-series and data-center cards preferred).
SKU catalog & pricing:
Standardized cards (GPU composition, CPU threads, RAM, NVMe, network, IB/NVLink, DC/location, traffic limits).
Prices tied to geography. Minimum term — 2 weeks.
Operational policies:
Incident response time: ≤ 15 min; hardware replacement: equivalent immediately.
Logging of disk sterilization, closure of admin access after return, audit.
Monthly reports on uptime/incidents.
GPU control
Passthrough with restrictions (PL/OC per host policy)
Full PL/OC control; NVLink/NVSwitch (if present)
IPMI/KVM/Virtual Media
No
Yes (remote console, ISO mounting)
Storage
Host volumes/mounts; bandwidth may fluctuate
Direct NVMe/RAID; stable IOPS/throughput
Network
Ports/NAT/shared bandwidth
Dedicated NIC 1–10G+; rDNS, VLAN; public IPv4
Reliability / SLA
Depends on host; no guaranteed like-for-like swap
DC Tier 3+, target SLA 99.99%, mandatory like-for-like replacement
Minimum term
Usually hours/days
From 2 weeks
Cost
Lower
Higher (exclusive + data center)
Time to start
Seconds–minutes
from 1h up to 48h to start
HPC / InfiniBand
Usually no
Recommended (InfiniBand), NVLink/NVSwitch
Best for
Quick tasks, tests, mining, short sessions
AI/ML/HPC, production workloads, long projects
Requirements for provider
Basic
Legal entity, DC Tier 3+, 24/7 NOC, regional pricing, API
Security / data
Within host policies
Disk sanitization between rentals, isolated mgmt (IPMI)
What it is
Container/environment inside the host OS
Entire physical server
Resources (CPU/RAM/bandwidth)
Shared by scheduler; cgroup quotas, possible throttling
Exclusive; predictable CPU/RAM/bandwidth
Root/privileges
root inside container, no BIOS access
Full server root; BIOS/UEFI access
GPU drivers (CUDA/NVIDIA)
Version defined by the host
You install required versions (CUDA/OFED, etc.)

This page lists every graphics card that has been banned from Clore.ai for breaking our platform rules - most commonly self‑renting, hardware substitution, or other prohibited behaviour.
We update this register continuously. Before commissioning equipment - or buying a used GPU on a marketplace - check here to ensure the card is not already banned.
If your rig runs Hive OS, you can retrieve the GPU ID (the GPU‑xxxxxxxx‑… string used in the list below) as follows:
Log in to your Hive OS dashboard and open the worker that hosts the card.
Click Hive Shell ▶ Start to launch a remote terminal, then open the provided link.
In the shell window:
The command prints one line per GPU, e.g.
Copy the line that corresponds to the card you want to check.
Check the ban status of a GPU by its GPU UUID:
Self‑renting (renting your own hardware to yourself to farm rewards).
Any tampering with the Clore Docker container or the software environment provided to renters.
Hardware substitution — e.g. listing a farm with 5 × RTX 5090 but swapping them for 1 × GTX 1060 during an active rental.
Compare this ID with the banned‑GPU list below. If it appears, the card is currently blocked.
Exploiting platform vulnerabilities to boost metrics such as MFP or otherwise gain unfair advantage.
Bypassing service fees, abusing referral or reward programmes, or any other fraud.

nvidia-smi --query-gpu=gpu_uuid --format=csv,noheaderGPU-c441ddc8-aa02-7c35-a8e7-d56d7a170c10gpu id
GPU-001f446c-b829-9906-de2d-00a654343ca4
GPU-9e3e1a55-d59e-b4db-6dcf-dfdf9d7ae890
GPU-e86d0491-7923-aebd-a433-90d1ea0bed05
GPU-235a4f2c-020e-7dfb-dc0d-da45bf7ac374
GPU-458eb4fb-b3e8-83ba-db72-3aad9aaa470b
GPU-9bb2555e-701c-c14a-5552-c86ee4eb3d30
GPU-eb33c412-40fa-591a-83ab-f271e0c47eaf
GPU-0b7c7d6b-3501-00c2-a1dd-05bf337e73c0
GPU-c07c3ce5-0abb-99f5-4ced-0cfa5efbd8b7
GPU-ad67b2bf-866f-7b25-df05-126a47ba1abb
GPU-d4745bdd-3f4a-4f48-6db6-8eb784bbf628
GPU-42827971-4e94-ba68-b9c8-b4499bace407
GPU-2662c707-22ea-a046-c3f0-5034779e3df7
GPU-400e5eb2-5410-579c-ad2e-41c933ea91b9
GPU-cd06f17d-45c5-90fb-13cb-54848b3ed99b
GPU-97bf3fa8-f80a-fb53-6309-4c345f66ac76
GPU-c441ddc8-aa02-7c35-a8e7-d56d7a170c10
GPU-15d2cf9d-8255-27a1-44ac-08305313340f
GPU-d8420e5b-a5f7-334c-470c-fb524c17a878
GPU-737f2b11-8cf6-4d49-ce80-183d3b0d6b07
GPU-3449ec77-8480-57f7-3af6-de9c23ad4966
GPU-90f225de-6513-6661-5205-566b16cde85b
GPU-715fb37b-ed08-b368-91a3-1f3bf19abb1c
GPU-a9c894ca-cf0a-0b20-9e14-402b7b2449e5
GPU-e2d23c8f-b1cc-9963-4092-87ca2dbb6f00
GPU-77b96020-b655-40ee-8597-2e5f30437548
GPU-d01ced75-3bf3-22d5-8a31-dc9591407ceb
GPU-4465b211-f19e-8af2-8838-563d0d44aac5
GPU-de9d48fc-a5ff-4563-9503-f5df43813d5e
GPU-dedc615c-3ce4-f30a-220a-2b4ca1125649
GPU-a2915c18-4ca4-edfb-043c-7357c59b3388
GPU-0f59c74a-fbf0-a5d5-c3be-8a369a899340
GPU-16a9ed81-e42b-26cb-da69-154982aa4b8a
GPU-49acd816-2d66-a877-835c-4a577000462b
GPU-e911a35f-a83a-2899-4894-fbf0e70b8a68
GPU-3a755856-b6ac-1466-fbbc-8b0c547b7bb8
GPU-28729e77-dfbe-a1c4-1ed5-50928ba42dd2
GPU-debc8ee0-77d7-624d-8e9a-fc644d3f85df
GPU-ef54915a-76da-2c88-c324-235a414eaf6b
GPU-fb87fd2a-d4e1-4d8f-7c21-c666a11508b2
GPU-1aaba1b7-e8a6-16a1-e8e2-8e755bf814a8 unbanned
GPU-041e804f-0a90-c358-08af-438f4ac657bc unbanned
GPU-2463a92d-6d75-403d-8720-fa6aac348175 unbanned
GPU-d49a5960-33ba-86d6-90b4-7410942159a2 unbanned
GPU-3d7df8e1-1112-414b-3f36-3d94abad64fd unbanned
GPU-6f80e6ee-379f-35df-b2fd-46bb50865a2d unbanned
GPU-68f34cb2-7438-8523-57af-bef5e4a8f757 unbanned
GPU-55f4ba58-2dff-4b75-5ed8-e2f87c9063bf unbanned
GPU-3aa6aee8-8a71-e4c6-81d3-c8294d57ff37 unbanned
GPU-dcab6394-d6bd-546d-c23c-06afc5cf2cfa unbanned
GPU-d7b77b1e-93e2-f625-9acf-a7939292293d unbanned
GPU-17dacd7b-756c-95fd-17ed-66364f728630 unbanned
GPU-477aa585-98c7-3bae-7543-00838d3cb436 unbanned
GPU-96918233-c889-9687-3bb5-aec69b187ed4 unbanned
GPU-42901281-9596-d360-b1a6-c976bbe7288a unbanned
GPU-f1e83180-ff31-48fb-ed29-01d5769dc18e unbanned
GPU-55286ca4-1d86-3d00-9b2f-3431529a028f unbanned
GPU-c487e592-b332-b6d1-b2ab-9f84f8123189 unbanned
GPU-9ad364c0-81f9-c393-4d31-6c7bf3ca3457 unbanned
GPU-c12757c2-f349-318a-2462-699c5a680d98 unbanned
GPU-34e41d33-1aee-c61a-ad52-006b60a1e4d9 unbanned
GPU-f3e7e76d-3722-dda4-0f66-9ce65a7c7f69 unbanned
GPU-8635ef91-203d-a9a1-0793-fd267145e628 unbanned
GPU-b92daf7a-4d6f-f068-fd1d-15e44d484e58
GPU-0698290e-d1e8-c34f-d0d5-a48ddc063240
GPU-e92db3cc-a10f-73c0-dd83-69333702d1fa
GPU-1fd837e8-cb9a-4e2f-561c-0f295fc5f34c
GPU-fd259989-8cc2-6d8b-fb48-57f17642c6ad
GPU-35312688-d4d1-8d60-17ae-4e9ac58b3ceb
GPU-6d8bb980-939d-9d93-aefa-bd3157014e5c
GPU-f4f64750-ece9-e05c-df8b-162c497b23ce
GPU-569da1a5-5a5e-3c91-7482-1fbf54ca8125
GPU-23bed51a-62d8-c139-c363-a86d57c81050
GPU-f7492b41-dc13-06fc-3721-77269116cd87
GPU-183abad4-0857-74cf-bb99-d772ff327228
GPU-791d59ee-5e21-06b8-9caf-c860431c473c
GPU-4e564a7e-3b47-7a57-e091-a7dde6f4136c
GPU-b7b5c361-5acd-82ad-9105-ff134071298d
GPU-bdf73977-fc70-7892-bb8e-259fb7cb270e
GPU-ade63ada-e427-4415-9d94-cfb9c8a72582
GPU-67be8b22-7d92-48ec-adec-bbdd1e7db670
GPU-458cc5f5-768b-dfb1-eb12-d4a8f8ac2d37
GPU-1379be3c-62f9-9813-0c7a-af0a440ac91c
GPU-4792be81-c719-bcf7-2974-136ca4fe124e
GPU-a10f2da8-053b-7867-b7fb-f547378ba7b7
GPU-d4e9a8d0-8cf1-8557-0f7c-f8c53268d04b
GPU-dc54ab79-956f-6be9-5d81-883cd204cee4
GPU-3328e759-df3a-cd5d-a9ff-7c23a0a981ec
GPU-4d1de856-26c3-1707-e4a1-a64dc3e326e1
GPU-35e71dc9-ed54-2668-5e78-46e44d5f801a
GPU-300f5dff-4f94-8183-2406-b4eed34a22df
GPU-a1a4a4b6-f7ed-9973-fc59-8c2b1994bcde
GPU-056a9981-f981-cf15-0bb3-9798c6e0fae2
GPU-3f24a77d-1724-17ef-f0e8-7f9b3b7cf459
GPU-97a77b08-e0bd-e1fa-12a5-edc080d1e818
GPU-71971c8a-fe83-96d0-32e2-0a5576eb7213
GPU-442c3174-a718-d7e7-dea5-5b79af953f9f
GPU-62dc4fcd-0c5d-9692-065c-d529bdb474ff
GPU-2a397b11-4e4a-5032-3e26-2664fdf3b31b
GPU-85516a2b-4c76-ce29-8d94-5c7b4b3300d1
GPU-d48ad9d4-1be3-1955-cafb-2ef27e8d16ff
GPU-fc48e85c-be7a-1d43-6f1e-31bc6500f0a5
GPU-c0351aa7-6d76-36a7-60fc-b106fcbdac2c unbanned
GPU-32c902bf-40b7-10f7-31d9-c2286ae08dc8 unbanned
GPU-0ed779de-2a8e-5b4d-173d-b849135a0ddf unbanned
GPU-80ec3f00-1a7c-58e7-b30b-ba54ac17b87e unbanned
GPU-7e780b6b-ad75-3ed3-d49c-3c22b7b7ce5f unbanned
GPU-58e2e00f-5477-f848-b6b8-8ac480d3a859 unbanned
GPU-0ab6973b-c48a-6e84-0a63-308042920ea3 unbanned
GPU-b97d80e6-c9da-3206-e284-02f9c51ac00b unbanned
GPU-a8101a2b-6f3b-08bd-2a69-8c921afe8b9c unbanned
GPU-246e414a-99fd-272f-6d73-03821e6e9790 unbanned
GPU-e0dd7322-1802-3a22-d059-0b4e8025d52b
GPU-8cebfe61-8b1d-2426-0402-8a82b47a9607
GPU-69251897-19a2-6b0e-13af-97b0fd47f8b0
GPU-83235d4a-7c42-be3e-7de2-298b9d184827
GPU-f2f797d9-863b-3349-a4ec-9828ffff0066
GPU-9ead8642-1ec1-21d0-18e2-3218fd3886f4
GPU-15839fd4-4031-31b7-aed7-5fbfc7e22511
GPU-c0951a9d-541e-8b6a-8648-5f20b2a75f81
GPU-448c5c5d-3f61-9c19-4d3b-d49860c6bac1
GPU-fa4c2d7d-488f-4bb4-dfd5-e7e1dca1309d
GPU-953ff25c-b452-0001-7b10-26575a0a7f6a
GPU-dbd80a22-9f16-322d-9a33-38c86c634ca6
GPU-9ce62cc3-c94a-5e9e-a518-547277520c2a
GPU-7a36ce70-a667-42bc-56e9-43da80ecab3d
GPU-b733d11f-656a-fd59-69e6-7ee24d06f3b1
GPU-b1ef05a5-43d2-87fb-c757-b3e464c45c21
GPU-1bd6bc81-9000-fb44-9735-fb3ffe98d092
GPU-d996c3f4-7ad9-3661-0ded-3ff1a533d2bb
GPU-724920de-2967-54a7-22ee-c5e5884ca2b0
GPU-551e59ea-18d2-211c-7903-0b14f18314e5
GPU-0fac6ee7-64fd-3ac4-00b2-0925ea64242a
GPU-9ce484ef-52ce-3a8e-a718-bb90d805705e
GPU-4b26a962-fe40-612d-0bfa-47e389560a61
GPU-8016c45e-399e-7cfd-fd16-ccd175cbfa08
GPU-3d6ecdff-adac-f0a0-9961-caf5ca3028a3
GPU-e7f9a8ef-33e6-654b-b4ed-fb1d228c4854
GPU-b9a7f57f-7be0-dad1-2444-7a341a8f5a04
GPU-18f26066-05ec-5629-b84d-2aee889d74fc
GPU-71c7a0a7-f85b-22eb-a85d-42c4f20fa296
GPU-8a562903-9a6f-d461-66dc-69b0f23c6eb5
GPU-2691b2be-ba9e-6342-23fe-da4d9619d3b1
GPU-ccd51b6a-4d17-f471-9d6c-9f82be65f0a7
GPU-d302774d-ae2b-f717-cd3f-b77fa923e649
GPU-5213d6b5-47d4-5c16-e9bf-3ea56af0f08e
GPU-c5f8d656-c929-473d-f92b-de5e3de44bb2
GPU-c0b10487-c902-37fb-7ffd-3e8e224ba186
GPU-cc5f01bb-35b1-41e4-36f6-7acc93c5532d
GPU-d4c9c371-cbe9-7940-cc51-ce6749f3af42
GPU-05553974-7880-0085-6e8a-a38a3166ab07
GPU-33ab04bd-2274-6b3c-7799-cbe37ffe4754
GPU-16fc8673-aae4-99cb-85ad-47fa9e812783
GPU-54168e15-1a11-c962-b3be-fb1d48c38895
GPU-fd445f1a-93be-24ed-bbeb-1acae3bb355f
GPU-c9082381-37bd-8695-91c1-be94e6936ee0
GPU-67ce2037-a909-4256-76d7-d4e954441eca
GPU-ba25180a-00c8-ca20-bbea-9755b4a4259d
GPU-38af1205-bea5-59a4-278f-392d6004c539
GPU-281feaf8-d865-36ec-5d9b-026de11e1d65
GPU-4a911e2b-b7ad-6cad-157e-4935b8450d68
GPU-50ab043d-2111-08eb-fb59-cd77e1ef74aa
GPU-93ed4acf-74c7-1625-c217-8d69bb825625
GPU-e97d1f46-a938-ac9d-d249-c9d35e34549e
GPU-944bf9a7-6dc2-b965-b5ea-7a67e7ae8dd1
GPU-35cdffcf-a044-6f83-de0a-7fcee2b04e11
GPU-12867de7-6d3b-8c19-d00b-0fb320595724
GPU-9096128f-4b73-75b2-0cc0-38871f6b5b02
GPU-5d14724e-385b-5fc1-40ce-bd9ef5a92ec9
GPU-272b7999-433a-7903-f156-3aac646cfdc1
GPU-b98e47e7-9c81-7030-fe7f-2566c1879a7b
GPU-3698e903-ffca-ed96-6174-0928ff22ed44
GPU-0a168991-0aec-f3c5-bbfc-c401f4ab720c
GPU-630477d8-490c-3f1c-d53f-c0d13840a3e5
GPU-f32ef427-2736-2d0f-13e5-4cba374af017
GPU-63cf052b-dec3-0a08-34e4-4e93498af173
GPU-fa53b7fa-b183-b0ca-9f97-76bf49970630
GPU-8d2ea040-def5-7d9e-67d7-56c3fe2d2dab
GPU-6203e3b8-3cf0-2214-6963-0fe4d549106d
GPU-e73c59df-5062-d390-80b2-8a67df07b3bb
GPU-8bfca0fe-80d7-5c34-cb4b-2690e770a2b5
GPU-892f07e1-bad2-e30b-3802-54782c3d715e
GPU-09c9280a-17f5-1ae6-1a26-ec021024fca4
GPU-73ac1332-0aec-e9bd-8f46-53952b98fb60
GPU-6331a78f-1ff3-ff9c-3c9d-c5ddfcdac1ac
GPU-a6589932-3222-82a2-7505-9a1d9e3cf7c6
GPU-ee5d85f3-91b1-4fca-0a63-012fdfc2faa5
GPU-02c1b93f-8a84-ec9b-1d90-8ad5446f97eb
GPU-03a2fd83-0ee1-eaa8-2f3d-52d89c173195
GPU-3e9c8cb8-84bc-8344-5a08-af29b9c4d9b2
GPU-80fc2d08-f0db-a39f-4cf8-14c2173ed1ee
GPU-373e4272-b84d-5a71-146a-2ebd95a877cf
GPU-34972143-afe5-5128-85f8-e5eabaafc519
GPU-6572ebd5-c8bb-dfde-dc55-cd3ca3ae0867
GPU-bbbfb298-c20b-416b-a188-f7a28ea033cc
GPU-fde09741-67a3-489d-bb82-799b03b43abc
GPU-c95eb546-bd4d-48be-afa4-034572690aa1
GPU-fefc5d39-f591-4852-8c53-1ffcb40d8369
GPU-d65c5845-98d8-4213-b216-5d7eb52ae6fe
GPU-3e5c63fd-07aa-4165-bdc3-99a45c8ae9dc
GPU-8c4c874c-add5-4431-b90c-9b9633947087
GPU-8b9f5e8d-8e1f-4d5e-9a6b-4b2e5e8f4b63
GPU-e7b2a3d1-1c9b-4f8f-9c6b-2f7a9f9b4c1a
GPU-2b7e8c3c-5e5f-4f5e-bb1b-6b8a5b4b0d2e
GPU-df8f0e1c-3d3b-4f8c-9e2d-1b8a4c9e3f7d
GPU-5b9a1e2f-7c3c-4d5a-8f5e-9c8b7a1e4f2b
GPU-b9da3209-0166-47c5-a0fe-c6b000f8ac42
GPU-4ac9006c-2ff8-4ecd-90e4-990a6376d63c
GPU-78d9f801-64db-47c9-9b4b-fd9818c82e55
GPU-79c72fe5-4aa5-4c35-8afe-6a001b977892
GPU-07e900f2-96ab-4040-9ee2-3343e2e9dedb
GPU-94667130-ab9e-45e0-ac1a-f80d79930558
GPU-494da28c-16af-4960-b07a-bd2788797651
GPU-592727f8-b3c9-4e8c-95b1-74eb42be78ce
GPU-26dd369c-3e8f-46cd-bf11-fd271730820f
GPU-03a31755-ea00-4f8b-b281-12f042439db6
GPU-5afcec8e-05ec-4291-b2cf-b6560a3994eb
GPU-2a0e3fd3-24af-4005-a031-ed1eef29d99f
GPU-ab86ac29-02ea-4a9f-8f6a-ae571dd23e80
GPU-a685138e-e2d3-4542-838d-35f47135f5d7
GPU-95ffdc7e-ebb7-423f-ac47-2fa2f8f211cd
GPU-d2648e02-ea98-4f99-b5b7-bcee3484d47c
GPU-981fce94-a2a8-4c8d-9dda-cf4b00dd7fcc
GPU-93b089a1-deff-41c0-88db-b35e8172eab3
GPU-3fcc749b-20f8-471c-9b01-713f30b68d2a
GPU-cb604b1b-e826-49c5-8c6a-baa8093c7935
GPU-c71b713c-a038-4033-9300-8d5d508894fd
GPU-7c680f26-d3db-4076-8dfd-f94a70dfa4b3
GPU-9de8763b-394d-45d5-9a8f-53d65ff8dec1
GPU-248a28ef-4cee-4966-88d4-796bb8f46c8f
GPU-f949028c-5fb4-41c9-883d-94f0ce735286
GPU-ecf5577d-52f5-49de-b83b-22fdaa574a45
GPU-b3fabd06-639b-410d-8a5f-b24f1744a305
GPU-3ead0308-4b27-4139-9ff2-6dab84865388
GPU-db2c069e-70e4-4914-82d3-7be7064e647a
GPU-d8b1e59d-c650-4241-928b-72ec203ea847
GPU-566b09df-4ce1-4f55-9e91-95fcbe625b0d
GPU-b74a98c0-66cc-497f-b7d9-ff072b7f9586
GPU-83500079-c80b-4035-a636-9e3eec4c954b
GPU-93575677-5d79-4311-ad26-b76ddbddc906
GPU-c4f2fc6f-c429-40f5-92ba-830f274f054a
GPU-4b0c3aef-5c1e-4b08-bc5f-0c0f3a4e5c1a
GPU-9f1a3e2b-7c4f-485f-b0e5-3d1f4c7e8b6b
GPU-50941b82-29dc-47bf-a24c-a226cc7ea987
GPU-12a4494a-480c-4663-adc5-028a3264f9cb
GPU-60ae4ac7-8b9c-4f21-80c2-3600c2232517
GPU-e375b039-78a3-466c-9adf-27f6513095b2
GPU-a55a7be4-d0ef-4f33-bf1c-f0b654403e95
GPU-c5a0f719-967a-46ac-a73f-3903a755bfdb
GPU-3f9dcf9c-d7e6-4b21-803e-2b7cfd5227f1
GPU-919dc56f-37ed-4d77-bf52-870f7a5a2c83
GPU-b1f4c7a0-c26e-4cc5-8982-a7792ceae276
GPU-60bebe62-86dd-4dc9-9643-1931cc2c4857
GPU-2041f5d4-ab3e-4670-a170-8489e362fc4d
GPU-5eff3ed7-ebd4-4703-ba02-2ce632ecbb1d
GPU-d44cc645-88f5-4611-8d25-c9c2276d604c
GPU-7d67a83d-e3cc-4843-97ce-a2ce86d88f67
GPU-a1294240-7d73-498d-a8eb-a797d9516c1b
GPU-8bdf4b76-9767-403e-b03f-64c9754afae3
GPU-73ba7d5f-770a-4443-99f6-448bb265a9ed
GPU-b2dcc1f4-6a22-4034-9efe-89b0b600f094
GPU-cc4937ff-3661-457f-bb44-0843e0536915
GPU-dd281e8e-05da-4651-a043-21e858c5baec
GPU-d3cde7d2-38f0-4bb1-a43e-4b17dcb4ac51
GPU-e3042b17-8361-4ea9-9a38-494569cce307
GPU-1c2416fb-8145-4910-b473-df4163aeea09
GPU-3fd8e822-0ce8-4ad5-be04-7b520ed88536
GPU-0c884c25-75ea-4e69-8c34-9d4768c52d9d
GPU-1ce4cc33-567d-4b4f-97f7-830184aeab6f
GPU-0fdc359b-5e6f-42ef-832e-e253a70380cd
GPU-0ae40dc6-7d79-48a7-8b67-10e76f9f723b
GPU-dd05e091-697c-48f0-b526-fdacec53b728
GPU-b6761af5-45d2-42f7-8f20-aa61e50b9996
GPU-4003f699-46df-43cc-a968-9f0a3f089824
GPU-0337b777-b9ea-4dda-bdd7-6f376fe1f436
GPU-d990103b-58c1-47bf-8258-1339099fa9ed
GPU-a6d107fb-0063-431e-bb80-57720c7ec688
GPU-67388370-9285-4164-a909-df7d4161652f
GPU-87bc88d5-d05a-4d81-8106-7a08e56f307d
GPU-0f3a5b2c-2c8e-4e5a-8b4b-4f7e8c4a1234
GPU-7d3b0a59-1f5d-4a4e-9f11-1f2e4c7b5678
GPU-9b2c8f9a-4f0e-4c3b-8e2b-7a5d9f1a9876
GPU-5bbb5988-7e65-676a-51e2-5eae0c6e3bf9
GPU-ed53e036-742d-a73c-d2dc-bfd6ef27632b
GPU-dd240824-83d4-ba99-bec6-1b7d957e292c
GPU-ea71b6aa-6fb7-ebd3-1241-621093032187
GPU-35f3b3b7-fdde-4de2-c70a-ff9f9475bd9b
GPU-1b8d45fc-1cf4-d2cb-7368-1965477e7b7b
GPU-41640276-daca-45fa-b64a-74b19fb9c6c3
GPU-21d986eb-edbd-b8d1-5cdf-9dd747e5b7be
GPU-4575facd-8049-a8ed-964e-b4e2347a95ed
GPU-85cc6011-c5e1-dbb4-c212-3c4d85d17398
GPU-419f1439-f3c1-d45f-c0c8-d91426b017cd
GPU-185672fc-460e-eccc-3cc8-e3f27674f324
GPU-1b4be2db-a1fd-1f59-52f2-aba63adfc05c
GPU-3de7cce8-599b-24ce-7dc9-2c278bfbed0f
GPU-4701a8f6-4ffb-51d0-100e-01c32f72280d
GPU-7d504e13-77fb-9810-560d-693d09a43527
GPU-a8af1643-a5b8-0d02-f636-e90a308889cf
GPU-c6b61828-e2d4-0249-2782-5731842e6386
GPU-c3ee6d8a-c05f-220f-4214-68625c37236a
GPU-b44159e9-03fc-d66b-1746-d5ab8129cad2
GPU-dc010f19-62cd-0e22-b510-aed3062498a9
GPU-7bb9c200-18c0-07be-aec2-548f11e29ce8
GPU-c16a3542-caeb-a63a-1375-0c470ac177fc
GPU-761584e3-8b16-cc7f-ad98-f840ff590292
GPU-9bafb349-b71e-f91a-e3da-590fd69ad52d
GPU-fb647df4-45fd-81ef-cad3-c42defc41e2e
GPU-592045af-b62a-00a5-a06e-735682273438
GPU-7fdac777-6989-39b8-9e43-bf6f24ec469d
GPU-dcb4fcc5-ea2a-d758-f5c1-e595c01aff91
GPU-2e028194-da3f-0824-6960-4e5b80db6abf
GPU-c8702c4e-75df-12e2-5a65-23b722a48062
GPU-786527a2-9e69-95a7-8e41-1a849680394d
GPU-eea2ca0d-6903-1231-2fa3-6e6e5e79f159
GPU-2d840d9c-f48e-3ea6-ff19-91526b53a331
GPU-fc67d3bc-43a8-d2d3-6dad-56cb005f1c6b
GPU-f3e8d1d0-b147-4f92-a69b-4b3da8d84bf1
GPU-11451540-4616-b445-1664-7f3ad1971e86
GPU-96e6094c-e6fc-4c37-88e5-322a4868a5fd
GPU-b3da4c6c-6477-c424-7f2c-616d029d78bb
GPU-fd9dd891-6293-8f07-079c-b0b50cd8dd53
GPU-9851d52d-3b63-7be4-1f15-d34e879f4d51
GPU-711f6603-346c-fddd-a914-ec8dc078d4fc
GPU-a800ded6-4c67-721d-18ce-bedcc79c5fcb
GPU-fb074718-ee8f-2b26-1342-664df10ae7ff
GPU-47caf6c9-79d3-98bc-c8e5-baef38e188b9
GPU-9ad4b9c5-6fcd-d456-6455-91b28714cacb
GPU-cf6f91f7-febc-74e9-bbb0-7a98a5788f87
GPU-8fbcb79c-76d0-2357-337b-e4914ce12692
GPU-b49d5f5a-e4ca-f367-e1c0-cbb16c09ba1c
GPU-12e74bb0-a0b9-f29b-9407-d6f87caaf756
GPU-5f3495e8-4883-7561-a7a3-606a0a5753df
GPU-015eef9e-a0bd-aa44-040d-aad8cd5629eb
GPU-b90382dc-f274-27f7-2df4-7bf07f9c9e5c
GPU-0a6b1b04-6b88-ada9-fefd-977f5b44c3ab
GPU-153273c8-9418-ea9b-3d0e-5738a29f51c2
GPU-b7c24b2f-2824-164b-4688-769c3533be51
GPU-e09d1221-a46f-7f77-d999-bd32125447fd
GPU-b98ca4bc-656e-5f20-4da8-68ef0f621336
GPU-edb6b69f-4fc7-4b62-8c47-79bf26976c4b
GPU-db25fbf5-1d2e-ad9c-3de6-e357348fcb2c
GPU-89895123-2166-32d7-261b-9364cd7d20b0
GPU-5fc426cf-fffe-c3bc-c2fa-ac5be9b1588a
GPU-29ca18fc-6fa7-f68e-704b-864333cd07fd
GPU-d7f39e65-e3b3-7233-1f3f-019d38a7a945
GPU-7e2444ec-da46-8272-fc0e-b56aafa0d890
GPU-eba599db-aef5-67a0-f53c-ec90932f8e95
GPU-427a8949-bd5f-1204-1775-ce9e0aa924cd
GPU-99ffb474-3214-ff44-1d1e-b96cdde979af
GPU-9fd05f14-e1af-f6ab-da1f-f45f65739319
GPU-8fdf7d4c-7714-f431-d93b-d181f6e44840
GPU-fec677c0-c341-36e5-7bc2-98928f78546c
GPU-7427f52f-0e28-aaf3-f0c1-0c122ebd43f5
GPU-c0a20aee-05d8-09ec-c28e-1fa64bf987ed
GPU-3939264b-9dfa-3ee4-03de-0de900833852
GPU-a5d7ba5b-370f-3cd2-62c5-9dea894cba12
GPU-2ac8e81b-d2f7-c661-41ed-e7be767a2204
GPU-8ca406f7-ea40-3ca4-8235-4bdd09075d40
GPU-93d6ab90-3080-a12b-dcc6-e0f8b7e33e65
GPU-f26b9602-f431-c86d-986c-a061ac5bdcf1
GPU-44b194b1-74e0-060c-1761-fbba1670cc80
GPU-696639ae-7174-aa15-bedc-7d63c2aaabea
GPU-f4b5c2e8-0148-2ced-fdf0-da103a93fa2b
GPU-e019cd6d-8817-c8c5-bcbe-95fe8a726877
GPU-2c49c92d-13f1-eb55-2465-860142c3f22c
GPU-4156c23d-c424-1c9a-2fea-bfe19ea34c37
GPU-64246f41-0d4a-1c81-7153-a8877c9430b1
GPU-9afaef7c-4f52-272d-a747-a5e67bc57f04
GPU-56f0b96b-8f85-65fc-2db7-75b973d1f708
GPU-9679a09c-22d3-ea2b-c7c9-ad8409933842
GPU-fd9c1c4a-0647-bc45-b910-1be752286faf
GPU-1fc76a36-7d0c-076a-3332-722be8d13ab4
GPU-e5992cc6-4633-a9df-ba8e-b9903c3d02ad
GPU-cd68e97f-4e80-d2d4-5b0b-2f72fa099019
GPU-6fd31c30-2257-21d7-2a01-170d3b86c1d0
GPU-e1a588c5-b6b1-d909-a81f-3781f7b4e4ed
GPU-6f3eab84-1f22-7925-f747-ce1d3ed6236a
GPU-e0aa7050-95fd-f368-6a2a-f828ca728be1
GPU-71968c8a-9c56-2cf7-af62-00e91b3cdab2
GPU-01b097c5-913e-3036-4038-1cd3b252bfe2
GPU-c9f0ff98-3041-73f4-f451-f023f7e95ee8
GPU-6405cdfb-b53d-06f2-d81c-352eab05f346
GPU-fb8a549b-a550-3420-cbdf-c00a2896b64b
GPU-826ecb18-092f-c331-df34-8222622f4f2a
GPU-10a3ba8c-55f3-a8e4-10ea-9cb019d7e17f
GPU-7a629807-4454-c264-80b8-0c711da1e4ba
GPU-ee9aff4e-284f-030f-4eb9-0b38dad3badd
GPU-8f10650c-2493-7805-fe8a-6340b81bd834
GPU-f227e05f-d1de-bd91-109c-76140f4cb37b
GPU-3261621b-c5f0-2c23-1c34-6104c63b2c44
GPU-224639b2-c8cd-6c54-1b6a-cec74a3924d4 unbanned
GPU-6c858ef2-a53e-e9f8-17af-45dc5844ea20
GPU-0f250aac-d694-732f-c0ba-9a21d7e2c29b
GPU-2f193d53-329a-7fad-d673-43093ad98321
GPU-8e65927e-a227-0170-351d-0ffc2fd93938
GPU-21d54733-5ecd-8c70-b619-dee5295fccc1
GPU-7aaf3bf7-d09d-6113-6a6c-4729586b726a
GPU-104e6ef6-0b82-a04d-4f1a-df5027177ae1
GPU-9929b97c-47bf-8fac-97e3-bf91b53ffdd5
GPU-d6707021-f5d9-c8c2-8de8-53ca4a317744
GPU-17cf685f-b305-a41f-ef27-aa6631cabbd9
GPU-1b766105-b94e-3354-51fc-3141edae7411
GPU-de02ddb5-03e0-c85c-567b-7a038f6a7853
GPU-13bca69f-b1e4-eaed-24bb-c3a849d0c4b9
GPU-a6fee343-7842-b231-f4b5-82f6c33332db
GPU-ba23b60a-d746-f11c-693a-2e79529bc76d
GPU-bdf4af3b-1e7e-26d2-9577-638b9446c0b7
GPU-1dbd4185-2c15-4e07-353f-7e583914fa4f
GPU-6419672b-7879-bbf2-09a4-69249777ad2b
GPU-0715f921-7249-b4c9-cd7a-76d2a0baa2d5
GPU-b206b34b-a9ee-3600-a238-628cfd27d528
GPU-30af9830-d5d7-e881-f8de-8f75761be018
GPU-67c8844f-8c39-ec98-a0d3-e139a61c5b3e
GPU-7766a7d1-22b3-6450-b942-394698ddfcf9
GPU-d819aa83-0258-a0e6-951e-a9b8a7b66283
GPU-7be026ca-7dd6-ec2f-30a5-6e54304dfa83
GPU-2be7a58e-426e-66d6-368b-b4c2b794a03c
GPU-51cad0aa-8984-1c81-ac14-3384d1507d4a
GPU-d7810df0-5bc2-7fbe-e3a6-4ef5c933c802
GPU-5518978f-a831-92b0-3065-53a19942b069
GPU-fdb5e235-f638-d7ac-6b1f-0faeb971e9ce
GPU-f232c074-2b6e-adf1-0dae-032af86ff46c
GPU-91c2d454-869c-a9a9-4309-c5bbb98ff126
GPU-a36ff0ee-c605-fdd9-e740-a8fb048407f1
GPU-97e12548-9dfa-94b1-1672-6b2a03ee2d32
GPU-2408eace-7680-4d65-e485-1e7ae027f442
GPU-d8d8e6f8-e834-75d9-70a5-f7b28d10c7e1
GPU-bcfddebb-2f98-e3bd-a013-999cd91a8264
GPU-aa98766b-2b59-5237-b9cf-112a2028b725
GPU-c442c856-066d-b995-a9bf-3d7e841ed474
GPU-55d7d4a6-713c-2821-75d8-3f4b2c7fa902
GPU-77db2ee2-5d33-f2b1-3e52-d0d8141e2277
GPU-f36c6ae6-ed4c-9f2d-acb4-cd5d7453a1ee
GPU-83001656-b696-9874-11d9-df09e714f082
GPU-1342b9bd-774e-7e5c-ad12-fc8f149fd572
GPU-2e4ee815-848c-70ee-e4f9-2c3f0162ebe7
GPU-3ed4bb6f-b79b-22e3-c358-3bcf6f9c72df
GPU-d4437df5-08ce-e18c-db82-1209035b68cc
GPU-47b6f4e7-0c26-c632-6ad1-c7472291b376
GPU-1869ea32-d437-39c3-8731-69bb62d390fd
GPU-41296b2f-7b31-3f3b-d75e-6d7c3a6ed63e
GPU-af5a8227-ed6c-83c6-e9b2-0ffec222b1e6
GPU-af2beaca-0e6c-1451-21e0-4dc3ceb93fbf
GPU-8c512dc6-4c9f-5818-a715-69bb433a4735
GPU-14ce04d2-ff87-de3c-3b20-992660faa369
GPU-1a3aa5be-cb8c-e0bf-daa7-e2e03bce7f67
GPU-73317204-bd25-9abb-950e-0438ec665195
GPU-bc1df9c9-9af5-791a-37af-16a72b7f5f3c
GPU-1c8ac443-23c5-7ddb-692b-8dc4a5fa92c0
GPU-55d64197-7c8e-a31e-de8c-5fd3d06fb037
GPU-c3865dda-889e-9527-b615-7ef63e32f478
GPU-030f14a8-2538-488d-2046-63e87e59a91e
GPU-658a913f-386d-5837-ceb0-a9062433b10b
GPU-07b86aa2-4933-9214-e4a4-fc747753ff1f
GPU-c97cd48c-bacb-016b-2584-c0df2bff3533
GPU-97d6ed26-6fd7-c81c-7433-f5882dbe076b
GPU-80fd2832-2eb8-e9d1-da6e-81344ad22218
GPU-0d2b393b-cba4-bbbf-5e42-8b28ae3e0ec1
GPU-959f39ba-a441-0210-deae-3199a509155b
GPU-4837fb1c-1c48-8614-54bf-c7ea4860501d
GPU-452303e1-8926-4ce9-3c45-8ca91ae77f58
GPU-54bf6d9c-978d-7f2f-f5ee-e13f286fdc32
GPU-74f0d7cf-d753-4bae-aefb-4a452e9e2bae
GPU-38b84263-d1f3-ae46-d9bc-8514632ded7a
GPU-747f707c-3b9a-d9ab-817a-591395e800f6
GPU-57fbd020-4644-95b3-614d-fc565f9f31d2
GPU-627b2f6d-d67d-6006-cbf4-0ed2f71544cf
GPU-14ada791-a8ce-209c-31a2-596cb8689bab
GPU-d89b5514-763d-4612-b337-0f714b296a29
GPU-23f678ad-b071-e63f-b132-5adf5834915c
GPU-e4cd1aa2-d401-6cc2-73ea-145c095753d5
GPU-3885658b-85dd-c342-057c-c3730fe2aee7
GPU-6fd67a0d-a31b-eb6b-abe5-6e4ad960e6e6
GPU-31a5816e-540b-e34a-f440-26323ae13bec
GPU-4f0759a8-7c6a-2353-7de4-668a9cc55870
GPU-d0a2d0d4-5460-c5c2-aaf3-3dbb2328b39d
GPU-33354f5f-3489-2d3e-37d9-6e041aa73a90
GPU-470cc5a7-9b83-878c-a548-77d6229c636a
GPU-e144e66e-4872-17b3-8636-d1ef060f50a1
GPU-1a1c231a-d772-be23-9226-dedbc0cd4a01
GPU-b102a56a-4554-d4a1-0d94-b8498e564301
GPU-7f516a28-7080-b98c-c19c-237eb69cc671
GPU-78289e5c-f4d6-60e1-7e52-bc23c2484142
GPU-663ce6eb-812b-cca8-365d-a81a2aefe448
GPU-7a35343d-941d-af77-41a4-db515a07aa96
GPU-461a6b58-728e-20de-08cf-23582bc24fce
GPU-f425d0ad-1389-9034-8fd0-7aadb3f384e9
GPU-923bfe7d-fedc-b7f1-8dca-f8c337e0023d
GPU-4424f43c-6b51-bf27-e358-1f6128e8ec04
GPU-0a17cf1c-9059-1f00-0c91-739cc03ae531
GPU-f98649ef-f487-44b4-7c7e-d5de7c71b9f9
GPU-7fd35aaa-a588-cf19-1999-2bc107720bc1
GPU-2cf6db25-1e8f-5a62-ef7e-d9e7792f2bcd
GPU-d962705f-f497-8f5b-d268-e34cadb2c915
GPU-bd9b8d01-44a4-f2f1-e3bd-7654069b7910
GPU-72902da5-426f-b715-19f5-bcf3919f3163 unbanned
GPU-ebdeb319-adf3-e628-2b94-e6b6dd4d5ede unbanned
GPU-733157cc-f367-80ad-f5f8-fdf7d14e4bf3 unbanned
GPU-90a2a57c-84f1-1707-c327-aebd6f87c203 unbanned
GPU-2ea5d1c8-9433-61ea-5060-e95772fbda2f unbanned
GPU-f3f23490-ecbe-7601-05de-91d1eef33adc unbanned
GPU-a74092ef-efcf-2d45-4ef4-a0283e2758ce unbanned
GPU-509b6c7e-7d38-522e-004e-17154f6c866e unbanned
GPU-22a93fb4-22a6-66e8-200d-8438ba3903df unbanned
GPU-1a7a797d-8c4c-524d-92ff-40ea478d8c81 unbanned
GPU-f92ea265-23ac-0276-5c5d-d3cae2e0ec99 unbanned
GPU-e1e6246e-a645-6ee9-d55a-d57398c93d26 unbanned
GPU-addf1b74-e4d6-5923-80a4-afe68787f8ff
GPU-a72b9a6f-dc07-338b-9199-790403e46c08
GPU-2222530e-607c-e56c-c3f2-9fe1e382ab0d
GPU-18e63610-6811-5963-80ca-9c830080b170
GPU-f03ba71e-96b5-f0d5-d48a-e94782b516c5
GPU-d6fa4811-e1b9-880a-c58d-e3a04919fc50
GPU-520756e2-2dbe-1e0e-3e4e-65be93cc6959
GPU-793a8339-2b35-d749-4833-ab9aa2174d11
GPU-2d74c45c-56dd-12f1-ff8e-d2a63f018eaf
GPU-c2f8f2ef-691d-7275-4912-7c5af4e0c188
GPU-a17ec95f-e3c5-949c-b7ed-1a728a40b856
GPU-103c43b5-511d-52bf-0a44-db81ad54acd5
GPU-bc7ba73d-5385-51cd-8dfc-7b79aed7801b
GPU-15541bce-8e55-d8d0-2bf7-cff655f7ff34
GPU-821b9c91-1077-1ae9-dba4-05c161bdc0f0
GPU-caf4bd5b-db40-c7ff-bb17-d1519e121e65
GPU-c18b2794-6db8-c2a4-1562-0f67538b6fb7
GPU-f3def060-4a42-4efe-1dea-5661f5385286
GPU-cb384309-8487-fe11-ae00-fd64332b3146
GPU-5d96561f-47ec-05f1-d6b8-7d13f071d57c
GPU-cbf4942b-5316-b50a-7c24-4d3c5c3f803d
GPU-e25a0050-66f8-f104-7b48-eb172bad2ecf
GPU-285472c0-0ab7-1c4a-de5e-2ec1e4b98bcf
GPU-af044b44-dabb-0874-b574-c4ba8fe96d8c
GPU-bd7164ad-da95-b22c-0bf8-47de012b085d
GPU-1920753d-6597-5002-f915-27df1828d67e
GPU-99afa20a-9d18-6a55-d663-44c7d346a5f5
GPU-39d8122d-da32-3822-a0ff-deef739e291a
GPU-334920ba-259d-5262-f311-e7984ffe4358
GPU-84148b9e-6448-d7e4-b0d3-c50fe397c3e2
GPU-31538ada-4b59-ae5f-8493-96a4b3559613
GPU-12addaa7-7c93-76e7-dc5a-8646edd9792c
GPU-7bacbac4-94f7-9f2f-04f2-bac941ccb56c
GPU-37775393-3867-2e12-78c8-33d7490c131c
GPU-c53baf8a-e9d0-7a46-6df4-9102a852c8aa
GPU-8277843e-6eb5-04c7-e73b-c1ab8f18a47d
GPU-3c666ff3-e48d-d431-4906-2567d2a36fe4
GPU-45227c7a-bacc-374f-5adc-c29074866b45
GPU-eb759823-9d07-0270-3336-f82875965f71
GPU-bc8bdffa-e297-527f-7efa-36b23117e8d0
GPU-9acd23fb-4523-b1e8-f633-b9ce6d2c11ae
GPU-8ea4a09f-3800-2607-83e8-307a0125a83f
GPU-889ac7eb-bb86-b2c7-3c4f-37001c40fecd
GPU-03fa551e-3650-d9aa-ac44-a382f0f28755
GPU-ef76ec9d-d383-0f5d-fbb7-4fa10f30c563
GPU-6b7544b7-86bc-0621-b61f-7c7abcb6e23d
GPU-859b0b5e-3817-09af-c7ae-a3fefe4eabdc
GPU-88d15866-f649-fa48-2aad-e65a084d22f2
GPU-19c4ff7a-98c5-bb48-4493-6e8606d24aeb
GPU-caa8e94d-5b86-8ffa-0b84-37e8f5274589
GPU-50520a87-3b43-1728-275b-2cd5d45eaabe
GPU-8483095e-0d41-39e8-058a-d12ddf95345f
GPU-a162e603-6a25-1d44-3c25-685adfc7bab2
GPU-58220d8d-3584-6433-28da-1d4338272ed8
GPU-ef25309b-191f-2e74-b2f9-82726d48cde8
GPU-433a3acb-7de9-0a5b-e7d0-efb883b81b6e
GPU-39376b6f-e6ed-5085-de0c-c3ed4ed0bb87
GPU-6f8b2db4-a628-0870-21ef-18ab0c2bd6a7
GPU-c37b7587-c59d-20bb-2813-d2e6cf682ac2
GPU-05ac3851-9f00-191b-c11b-9cbe1852ea01
GPU-5c2680fc-e752-86e7-cbae-3bd0272f57ef
GPU-6af39274-7193-5703-5ba3-b74b9dcbbe3f
GPU-b07c8a0c-c7c6-5dda-7378-e19b330000f8
GPU-9d3ca437-adc7-11bb-de1d-d12187dc8d16
GPU-afa53902-9d59-bcac-777b-91b742b4be96
GPU-95a6bc48-a872-b603-0eae-b1b4eeb4caf8
GPU-5e82be97-465a-4942-ec6e-549d66cdf821
GPU-9d6f1a02-3045-1385-7d97-4f22cdc91202
GPU-b119b504-7456-4a9a-aeae-3914cda85a00
GPU-74fb234b-80d4-736c-fd5b-0018dd013cf8
GPU-e6415350-3d5c-a33f-b0c8-c2365e24562e
GPU-1572c765-85f5-8b0c-f264-cc06dfad2bf9
GPU-c4c35be4-cd9c-e06c-7fd7-74d3ac770fa5
GPU-e12af7f5-8c8f-092d-c7c3-7319632b5c1f
GPU-9cd15e26-fe3d-e605-0fbd-6e1e5b5607c8
GPU-9325f3d5-e436-a94b-467d-9d2306b202b5
GPU-ce9126cd-ca2f-806e-a801-dbd49c7b83d1
GPU-4bdb7342-304e-d8dc-ea11-396e12070e1c
GPU-9a59aeee-62d9-2fbb-49ab-f4c123b3ab4d
GPU-21256502-b6fb-9878-5502-2fc096bac6cf
GPU-e8b91161-4444-f87c-9ac6-9a5b24ae6cb6
GPU-b48e2ef7-8481-b646-c099-c5ce6c87ce4e
GPU-96ed2016-304e-018d-9e5e-97a1c254e5fd
GPU-bb4ddfe6-456e-4ced-dd79-2dedd95e6964
GPU-f39bd8bf-1ccb-1b66-b298-b51a8966e11c
GPU-657e5856-7c71-3c82-afa9-24d5bb28bc8a
GPU-c62b6bc0-c55d-0b56-fff9-f7811ab5d36b
GPU-e3a5efcc-27e6-0d1e-6e3c-45ae938747d6
GPU-a041e7e5-1335-6027-251a-992d038f28ba
GPU-6e604e89-2363-ac9a-ea86-e546fbf1de4d
GPU-8bde9b68-1a94-692a-5e17-41a9b98fbf37
GPU-5bd66683-ffb5-ac26-df7e-ee096628b139
GPU-652bff72-61e9-0123-0a85-bcd3102b660e
GPU-f8201177-6a8c-c2c9-b3cd-1c7f3304715a
GPU-97e69965-050f-9c2f-5956-421d60430e2a
GPU-3547c442-dbb1-c59c-3ecc-7f0790787ccd
GPU-9fb61f4d-b4fd-4037-ae04-2af32effa527
GPU-82602eb8-38b8-cf00-66cf-62ac8c2bb8a5
GPU-a83f67d2-cae2-c20e-56dd-f9e8eda7fd88
GPU-9285c38c-fc1b-3b7b-be65-ad5e3a3fdeac
GPU-172ef0f4-b9f9-6d87-f213-a73a0e695090
GPU-42e92f47-bb15-20dc-aa54-37f0a4552497CLORE.AI api can be used to automate deployments of your workloads onto CLORE.AI
Firstly you need to get an API key
Responses are returned in JSON format, may have different fields
Always returned field is code, indicating status
code field
walletsAbout
Return wallets and balances
Headers
Output
Example
Input:
Output:
my_serversAbout
Returns your servers that you are providing to marketplace
Headers
Output
Example
Input:
Output:
*USD not implemented yet
server_configAbout
Get configuration of specific server
Headers
Body
Output
Example
Input:
Output:
*USD not implemented yet
marketplaceAbout
Get marketplace
Headers
Output
Example
Get marketplace
Input:
Output:
my_ordersAbout
Get your orders
Headers
Query string
Output
Input:
Output:
spot_marketplaceAbout
Get spot marketplace for specific server
Headers
Query string
Output
Input:
Output:
set_server_settingsAbout
Configure settings of server you are providing on marketplace
Headers
Body
Output
Example
Let's create a send proof for a transaction sent from the current wallet.
Input:
Output:
set_spot_priceAbout
Set price per day on your SPOT market offer
Headers
Body
Example
Let's try to update spot market price
Input 1 (Step down was too big):
Possible output 1 (Step down was too big): You can lower spot market offer price by max of 0.00000100 ₿
Input 2 (Valid price step down):
Possible output 2 (Valid price step down):
Input 3 (Lower price even more after sending Input 2):
Possible output 3 (Lower price even more after sending Input 2): You can lower spot price once in 600 seconds
cancel_orderAbout
Set price per day on your SPOT market offer
Headers
Body
Output
Example
Cancel order/offer
Input: In this example we are reporting issues with GPU #1, if you don't have issues, don't include issue field. You can write any message to text field and we will investigate it
Output:
create_orderAbout
You can create spot offer or on demand order with this endpoint This endpoint also allows only 1 request in 5 seconds
Headers
Body
* To fields marked with star you can only input characters from this regexp group /^[a-zA-Z0-9\s-=.@+/]+$/
Output
Example
Input 1 (Create spot offer):
Output 1 (Create spot offer):
Input 2 (Create on demand order):
Output 2 (Create on demand order):
6
Error specified in error field
servers[x].connected
string
Was the server ever connected to
servers[x].visibility
string
Visibility on marketplace
servers[x].pricing
[]string
Price/day on-demand
servers[x].online
bool
Is server online
servers[x].min_spot_pricing
[]string
Minimal price/day to rent for on spot market
servers[x].init_token
string
Initialization token
servers[x].specs
[]string
Server specifications
config.connected
bool
Was the server ever connected to
config.visibility
string
Visibility on marketplace
config.pricing
[]string
Price/day on-demand
config.spot_pricing
[]string
Minimal price/day to rent for on spot market
config.mrl
int
Maximum rental length in hours
config.online
bool
Is server online
config.initialized
bool
Was the server ever connected to
config.id
int
Unique server ID
config.rental_status
int
0 - not rented | 1 - Rented on spot market | 2 - Rented On Demand
config.specs
[]string
Server specifications
config.background_job
[]string
Background job when not rented
servers[x].owner
int
Unique owner ID
servers[x].mrl
int
Maximum rental length in hours
servers[x].price.on_demand
[]string
On demand price per day
servers[x].spot
[]string
Minimal spot market price per day
servers[x].rented
bool
Is server rented on demand
servers[x].specs
[]string
Server specifications
orders[x].fee
float
Fee (%) paid to
orders[x].creation_fee
float
Creation fee paid to
orders[x].price
float
Order price (cost) per day
orders[x].mrl
int
Maximum order rental length in seconds
orders[x].image
string
Used docker image
orders[x].currency
string
Currency used for billing
orders[x].spend
float
Money spend on the order
orders[x].ct
int
Creation time (UNIX time)
orders[x].p
int
Currently used proxy cluster
orders[x].specs
[]string
Server specifications
orders[x].si
int
Unique server ID
orders[x].pub_cluster
[]string
Public endpoints with forwarded ports
orders[x].tcp_ports
[]string
TCP port forwarding
orders[x].http_port
string
Container port forwarded through HTTPS proxy
orders[x].spot
bool
Indication that it is spot order
orders[x].expired
bool
Indication that the order has expired
market.offers[x].offer_id
int
Unique offer ID
market.offers[x].bid
float
Offered price per day
market.offers[x].active
bool
This offer is currently used
market.offers[x].my
bool
This offer is owned by me
market.server
object
Server information
market.server.min_pricing
object
Minimal offer price per day
market.server.mrl
int
Maximum rental length in seconds
market.server.visibility
string
You can create offers only when visibility is public
market.server.online
bool
Server is online
on_demand
float
Yes
Price per day for your server on demand
spot
float
Yes
Minimum price per day for SPOT offer
type
string
Yes
on-demand OR spot
spotprice
float
Depends
Offering price per day on spot market, required when making spot order
ports
object
No
Port forwarding configuration, max 5 records
env
object
No
Environment variables, limited to 12000 characters in total when stringified. Variable name - 128 symbols max Variable value - 1536 symbols max
jupyter_token
string
No
Jupyter token for images that has jupyter notebooks, maximum 32 characters *
ssh_key
string
No
SSH key for images with SSH, maximum 3072 characters *
ssh_password
string
No
SSH password for images with SSH, maximum 32 characters *
command
string
No
Command will be run on server after order creation
required_price
float
No
Specify price for what you want to start the order, if machine owner changes the price, then order will not start (on demand only)
autossh_entrypoint
bool
No
Use clore.ai entrypoint, that autometically deploy SSH server and custom /root/onstart.sh script
0
NORMAL
1
DATABASE ERROR
2
INVALID INPUT DATA
3
INVALID API TOKEN
4
INVALID ENDPOINT
5
EXCEEDED 1 request/second limit
auth
string
Yes
API token
code
int
Status code
wallets
[]string
Array of wallets
auth
string
Yes
API token
code
int
Status code
limit
int
Maximum number of servers you can own
servers
[]string
Array of servers
servers[x].name
string
User selected server name
auth
string
Yes
API token
Content-type
string
Yes
Must be application/json
server_name
string
Yes
Server name
code
int
Status code
creation_completed
bool
Is server creation complete
config
[]string
Config of server
config.name
string
User selected server name
auth
string
Yes
API token
code
int
Status code
my_servers
[]string
Array of server ids you are providing to clore.ai (can't be rented)
servers
[]string
Array of public servers on marketplace
servers[x].id
int
Unique server ID
auth
string
Yes
API token
return_completed
bool
No
Return completed (expired) orders
code
int
Status code
limit
int
Maximum count of active orders
orders
[]string
Array of orders
orders[x].id
int
Unique order ID
auth
string
Yes
API token
market
int
Yes
Unique server ID
code
int
Status code
exists
bool
Verification that the market exists
market
object
Marketplace
market.offers
array
Rental offers for the server
auth
string
Yes
API token
Content-type
string
Yes
Must be application/json
name
string
Yes
User selected server name
availability
bool
Yes
Can server be rented
mrl
int
Yes
code
int
Status code
auth
string
Yes
API token
Content-type
string
Yes
Must be application/json
order_id
int
Yes
Unique offer ID
desired_price
float
Yes
Your offered price per day
code
int
Status code
error
string
Error description field
max_step
float
Lowest possible value to what you can currently lower price
code
int
Status code
error
string
Error description field
time_to_lowering
float
Remaining time (sec) to next possibility to lower price
auth
string
Yes
API token
Content-type
string
Yes
Must be application/json
id
int
Yes
Unique order/offer ID
issue
string
No
If you have encountered any issues with the server you can report them to clore.ai team, maximum 2048 characters
code
int
Status code
auth
string
Yes
API token
Content-type
string
Yes
Must be application/json
currency
string
Yes
Currency name
image
string
Yes
Valid image from dockerhub
renting_server
int
Yes
code
int
Status code

Maximum server rental length
ID of server you want to rent
curl -XGET -H 'auth: b8qwqRAL5W7YDyDJeB4XANVvKndbrrPk' 'https://api.clore.ai/v1/wallets'{
"wallets": [
{
"name": "bitcoin",
"deposit": "tb1q6erw7v02t7hakgmlcl4wfnlykzqj05alndruwr",
"balance": 0.00153176,
"withdrawal_fee": 0.0001
}
],
"code": 0
}curl -XGET -H 'auth: b8qwqRAL5W7YDyDJeB4XANVvKndbrrPk' 'https://api.clore.ai/v1/my_servers'{
"servers": [
{
"name": "Michael",
"connected": false,
"visibility": "hidden",
"pricing": { "bitcoin": 0, "usd": 0 },
"online": false,
"min_spot_pricing": { "bitcoin": 0, "usd": 0 },
"init_token": "qnwVIMsZPjUWS7jw6gAbTOeoGQNgTH9XVxJaiCEbG0OlmfjF"
},
{
"name": "Jan Vykydal",
"connected": true,
"visibility": "public",
"pricing": { "bitcoin": 0.00010337, "usd": 0 },
"online": false,
"min_spot_pricing": { "bitcoin": 0.00005168, "usd": 0 },
"specs": {
"mb": "Z590 GAMING X",
"cpu": "Intel Core i9-11900",
"cpus": "8/16",
"ram": 64,
"disk": "NVMe 512GB",
"disk_speed": 2000,
"gpu": "1x GeForce GTX 1080 Ti",
"gpuram": 11,
"net": {
"down":119.61,
"up":25.24
}
}
}
],
"limit": 16,
"code": 0
}curl -XGET -H 'auth: b8qwqRAL5W7YDyDJeB4XANVvKndbrrPk' -H "Content-type: application/json" -d '{
"server_name":"Jan Vykydal"
}' 'https://api.clore.ai/v1/server_config'{
"config": {
"name": "Jan Vykydal",
"connected": true,
"visibility": "public",
"pricing": { "bitcoin": 0.00010337, "usd": 0 },
"spot_pricing": { "bitcoin": 0.00005168, "usd": 0 },
"mrl": 72,
"online": false,
"initialized": true,
"id": 4,
"rental_status": 0,
"specs": {
"mb": "Z590 GAMING X",
"cpu": "Intel Core i9-11900",
"cpus": "8/16",
"ram": 64,
"disk": "NVMe 512GB",
"disk_speed": 2000,
"gpu": "1x GeForce GTX 1080 Ti",
"gpuram": 11,
"net": {
"down":119.61,
"up":25.24
}
},
"background_job": {
"times_updated": 1,
"image": "cloreai/ubuntu20.04-jupyter",
"command": "",
"env": []
}
},
"creation_completed": true,
"code": 0
}curl -XGET -H 'auth: b8qwqRAL5W7YDyDJeB4XANVvKndbrrPk' 'https://api.clore.ai/v1/marketplace'{
"servers": [
{
"id": 6,
"owner": 4,
"mrl": 73,
"price": { "on_demand": { "bitcoin": 0.00001 },
"spot": { "bitcoin": 0.000001 }},
"rented": false,
"specs": {
"mb": "Z590 GAMING X",
"cpu": "11th Gen Intel(R) Core(TM) i9-11900 @ 2.50GHz",
"cpus": "8/16",
"ram": 62.67348861694336,
"disk": "NVMe disk 247.3623046875GB",
"disk_speed": 0,
"gpu": "1x NVIDIA GeForce GTX 1080 Ti",
"gpuram": 11,
"net": {
"up": 26.38,
"down": 118.42,
"cc": "CZ"
}
}
}
],
"my_servers": [1, 2, 4],
"code": 0
}curl -XGET -H 'auth: b8qwqRAL5W7YDyDJeB4XANVvKndbrrPk' 'https://api.clore.ai/v1/my_orders?return_completed=true'{
"orders": [
{
"id": 38,
"fee": 5,
"creation_fee": 3e-7,
"price": 0.00001,
"mrl": 262800,
"image": "cloreai/ubuntu20.04-jupyter",
"currency": "bitcoin",
"spend": 6.944444444444445e-9,
"ct": 1667401396,
"p": 1,
"specs": {
"mb": "Z590 GAMING X",
"cpu": "11th Gen Intel(R) Core(TM) i9-11900 @ 2.50GHz",
"cpus": "8/16",
"ram": 62.67348861694336,
"disk": "NVMe disk 247.3623046875GB",
"disk_speed": 2000,
"gpu": "1x NVIDIA GeForce GTX 1080 Ti",
"gpuram": 11,
"net": {
"up": 26.38,
"down": 118.42,
}
},
"si": 6,
"pub_cluster": [ "n1.c1.clorecloud.net", "n2.c1.clorecloud.net" ],
"tcp_ports": [ "22:10000" ],
"http_port": "8888"
},{
"id": 36,
"fee": 2.5,
"creation_fee": 1e-7,
"price": 0.00001,
"mrl": 262800,
"image": "cloreai/ubuntu20.04-jupyter",
"currency": "bitcoin",
"spend": 1.3888888888888888e-7,
"ct": 1667248597,
"specs": {
"mb": "Z590 GAMING X",
"cpu": "11th Gen Intel(R) Core(TM) i9-11900 @ 2.50GHz",
"cpus": "8/16",
"ram": 62.67348861694336,
"disk": "NVMe disk 247.3623046875GB",
"disk_speed": 2000,
"gpu": "1x NVIDIA GeForce GTX 1080 Ti",
"gpuram": 11,
"net": {
"up": 26.38,
"down": 118.42,
}
},
"si": 6,
"spot": true,
"expired": true,
"tcp_ports": []
}
],
"limit": 13,
"code": 0
}curl -XGET -H 'auth: b8qwqRAL5W7YDyDJeB4XANVvKndbrrPk' 'https://api.clore.ai/v1/spot_marketplace?market=6'{
"market": {
"offers": [
{
"offer_id": 39,
"bid": 0.0000042,
"active": true,
"my": true
}
],
"server": {
"min_pricing": {
"bitcoin": 0.000001
},
"mrl": 262800,
"visibility": "public",
"online": true
}
},
"exists": true,
"code": 0
}curl -XPOST -H 'auth: b8qwqRAL5W7YDyDJeB4XANVvKndbrrPk' -H "Content-type: application/json" -d '{
"name": "Jan Vykydal",
"availability":true,
"mrl":96,
"on_demand":0.0001,
"spot":0.00000113
}' 'https://api.clore.ai/v1/set_server_settings'{
"code": 0
}curl -XPOST -H 'auth: b8qwqRAL5W7YDyDJeB4XANVvKndbrrPk' -H "Content-type: application/json" -d '{
"order_id":39,
"desired_price":0.00000200
}' 'https://api.clore.ai/v1/set_spot_price'{
"error":"exceeded_max_step",
"max_step":0.0000032,
"code":6
}curl -XPOST -H 'auth: b8qwqRAL5W7YDyDJeB4XANVvKndbrrPk' -H "Content-type: application/json" -d '{
"order_id":39,
"desired_price":0.00000320
}' 'https://api.clore.ai/v1/set_spot_price'{
"code": 0
}curl -XPOST -H 'auth: b8qwqRAL5W7YDyDJeB4XANVvKndbrrPk' -H "Content-type: application/json" -d '{
"order_id":39,
"desired_price":0.00000220
}' 'https://api.clore.ai/v1/set_spot_price{
"error":"can_lower_every_600_seconds",
"time_to_lowering":513,
"code":6
}curl -XPOST -H 'auth: b8qwqRAL5W7YDyDJeB4XANVvKndbrrPk' -H "Content-type: application/json" -d '{
"id":39,
"issue":"GPU #1 Was overheating and throttling"
}' 'https://api.clore.ai/v1/cancel_order'{
"code": 0
}curl -XPOST -H 'auth: 6FcuR7ibcwKR1Z32lEFoSotzUUtzKO2H' -H "Content-type: application/json" -d '
{
"currency":"bitcoin",
"image":"cloreai/ubuntu20.04-jupyter",
"renting_server":6,
"type":"spot",
"spotprice":0.000001,
"ports":{
"22":"tcp",
"8888":"http"
},
"env":{
"VARIABLE_NAME":"VARIABLE_VALUE",
},
"jupyter_token":"hoZluOjbCOQ5D5yH7R",
"ssh_password":"Hpcj08ZaOpCbTmn1Eu",
"command":"#!/bin/sh\napt update -y && apt install htop"
}' 'https://api.clore.ai/v1/create_order'{
"code":0
}curl -XPOST -H 'auth: 6FcuR7ibcwKR1Z32lEFoSotzUUtzKO2H' -H "Content-type: application/json" -d '
{
"currency":"bitcoin",
"image":"cloreai/ubuntu20.04-jupyter",
"renting_server":6,
"type":"on-demand",
"ports":{
"22":"tcp",
"8888":"http"
},
"env":{
"VARIABLE_NAME":"VARIABLE_VALUE",
},
"jupyter_token":"hoZluOjbCOQ5D5yH7R",
"ssh_password":"Hpcj08ZaOpCbTmn1Eu",
"command":"#!/bin/sh\napt update -y && apt install htop"
}' 'https://api.clore.ai/v1/create_order'{
"code":0
}